Receiving reports
An article about the capabilities of configuring reports with granular data on preliminary payment processing results and exporting them for further analysis.
Overview
Dashboard allows you to obtain preliminary data on operational results (excluding final fees, deductions, and adjustments) in reports that you can use for further analysis with the help of different BI systems. Preliminary reports can include detailed data on payments and operations, chargebacks, operations identified as fraudulent, and B2B remittance payments. To create and configure reports in Dashboard, you can use the Reports section that can be accessed with a separate set of permissions (details).
Each report generated in Dashboard is a file containing relevant data that conforms to a preset configuration and is presented as a table.
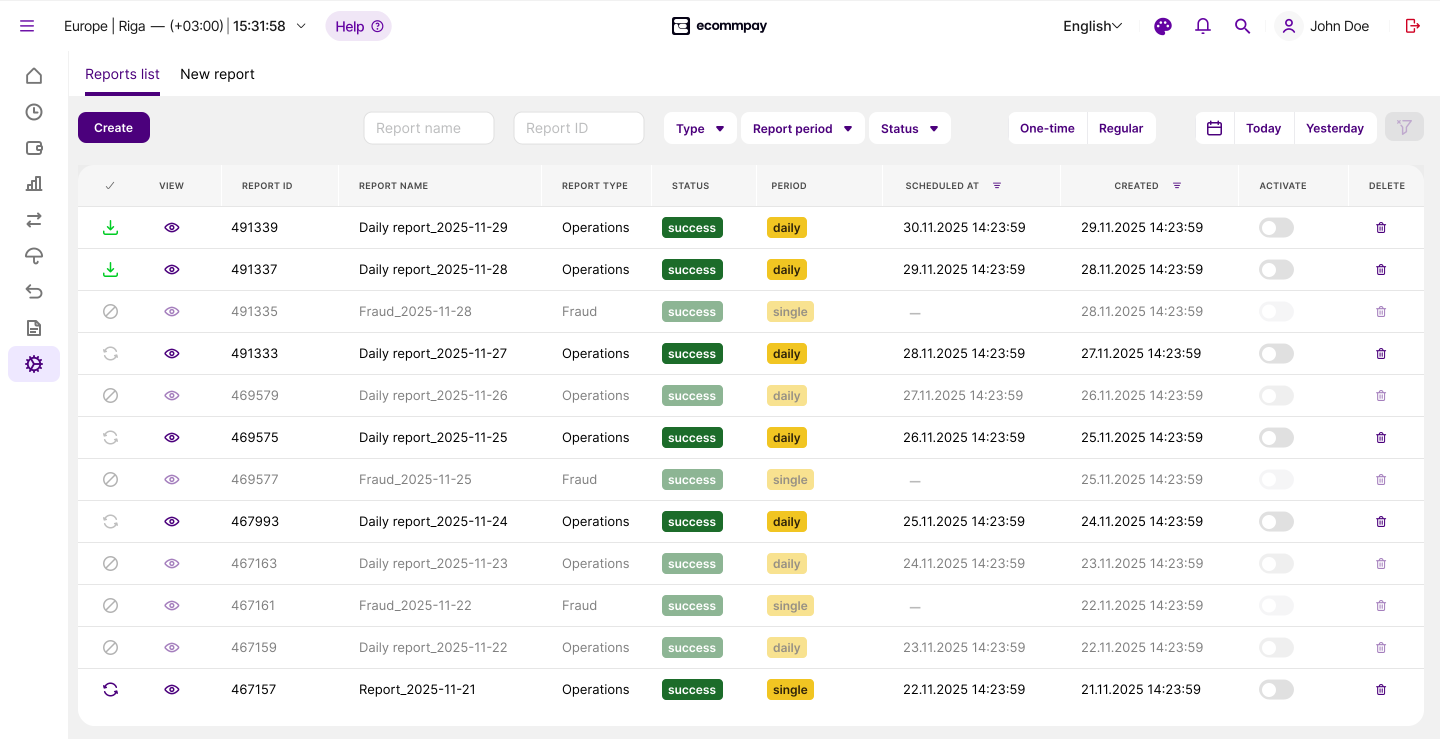
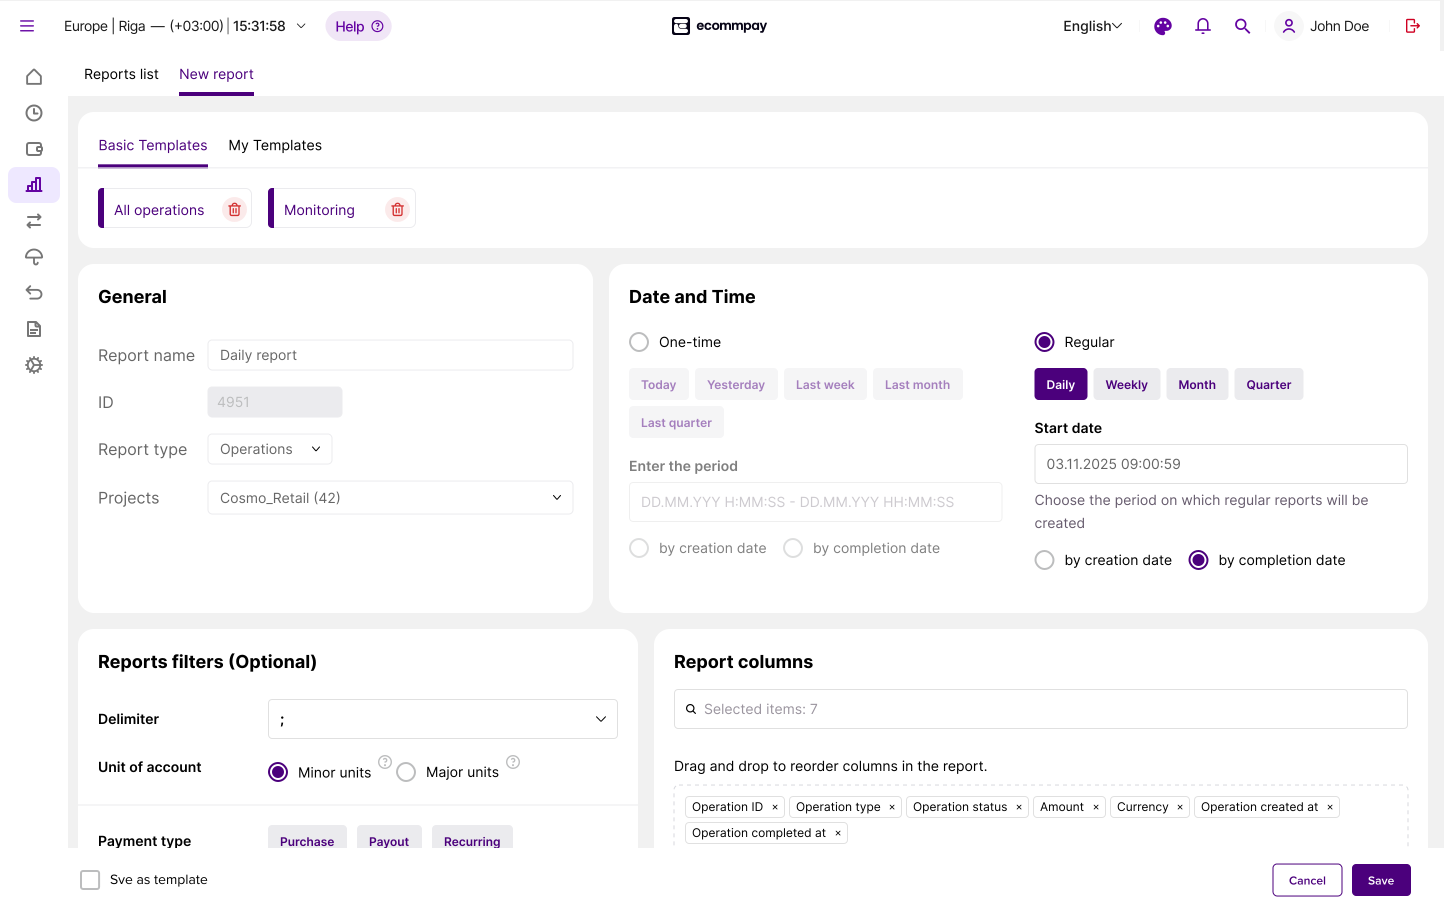
In the Reports section, you can do the following:
- Work with reports: create and download reports, set up recurring reporting, and manage the reports registry.
- Work with report configurations and templates: edit report configurations and save them as templates, as well as delete unnecessary templates.
Special aspects
When working with the reports created in the Dashboard interface, you need to consider the following special aspects.
- Single-user access. A created report file and its configuration can be accessed with the account of the user who set up the report. Reports and custom templates cannot be shared with other users via the Dashboard interface. In addition, the time zone of the Dashboard user account affects the data shown in the report file.
- Flexible configuration. Dashboard allows you to configure a wide variety of reports based on data on payments and operations, chargebacks, operations identified as fraudulent, and B2B remittance payments.
- Recurring reporting support. Reports can be generated either on a one-off basis, with each file created as a result of a corresponding user action in the interface (in Dashboard these reports are referred to as one-time reports), or on a recurring basis, with a series of files created automatically according to a defined schedule (in Dashboard these reports are referred to as regular reports). Records of all reports, including those created as part of a series, are displayed in the reports list in chronological order of their creation.
- Static data. A report captures data current at the time of its generation and is not continuously updated afterwards. If you need to update data in the report file, you can generate a new report with the same configuration.
- Single format support. Reports are generated only in CSV format, with no limit on the number of rows. If there is no relevant data in the platform that matches the report configuration, the reports list displays a record indicating that the report is ready, but no file is generated for download.
- Limited retention period. A report file is stored in the payment platform for four days from the time it was generated, after which it becomes unavailable. If you need to download a report file whose retention time has expired, you can regenerate it.
Working with reports
Managing the reports list
In the Reports section of the Dashboard interface, you can view the reports list—a table that displays records of generated reports and supports the following capabilities:
- Filtering records in the reports list with the help of standard filtering tools (details).
- Opening report configuration tabs (by clicking
 in a corresponding row).These tabs allow you to switch quickly between them and the reports list.
 - Deleting records of obsolete or incorrectly generated reports (details).
To help you navigate report statuses and perform individual actions on them, the reports list uses the following set of icons.
 |
indicates the in progress status. The request to generate the report is being processed. If the request is valid and relevant data is available in the platform, the report file is being generated. |
 |
indicates the empty status. The request to generate the report has been processed, but the report file was not generated because there is no relevant data in the platform that matches the report configuration. |
 |
indicates the ready for download status. The report file has been generated and is available for download (click this icon to download it). |
 |
indicates the expired status (and can be regenerated if this icon is active). The report file is no longer available because its retention time has expired, but you can regenerate it with the same configuration and a new name—automatically for a one-time report (click this icon) or manually for a regular report (create a new one-time report). |
Creating a report
Whether you need a one‑time or a regular report, start by defining its configuration. The configuration specifies which data will be included in the report file, the reporting period, and for regular reports—a schedule. When configuring a report, you can create a new one from scratch (defining all parameters manually), choose one of the available templates (preconfigured by the Ecommpay specialists or your own custom ones), or re-use an existing configuration that already fits your needs (if this configuration was not saved as a template).
To set up a new report configuration:
- Open the tab to create a new report in the Reports section.
Go to the Reports section and either click Create on the left of the filtering panel to create a new configuration, or click
in the corresponding row to reuse a configuration of a previously created report. - Set the configuration parameters manually or based on an existing configuration.
To do it from a template, open the Templates panel at the top of the report creation tab and then select a template from the Basic templates tab (preconfigured templates) or the My templates (previously saved custom templates).
When filling in the fields, keep in mind that:
- Some fields are mandatory: the Report name field, identifiers of projects in the Projects dropdown list (on the General panel), the reporting period fields (on the Date and Time panel), and the required data set (on the Report columns panel).
- The report name must be unique among the reports for the Dashboard account in use.
- The reporting period can be selected from predefined options or set as custom, with a maximum duration of 94 days (corresponding to a maximum period of three months with additional days at the boundaries of the range).
- The time zone selected in Dashboard and the type of operation sorting selected in the report configuration tab (by the creation or completion date) affect which operations are included in a specific report.
- Parameter values in a report file can be separated by a semicolon (";") or a comma (","). To set the delimiter, use the Delimiter dropdown list in the Reports filters panel.
- Each report type has its own set of available parameters.
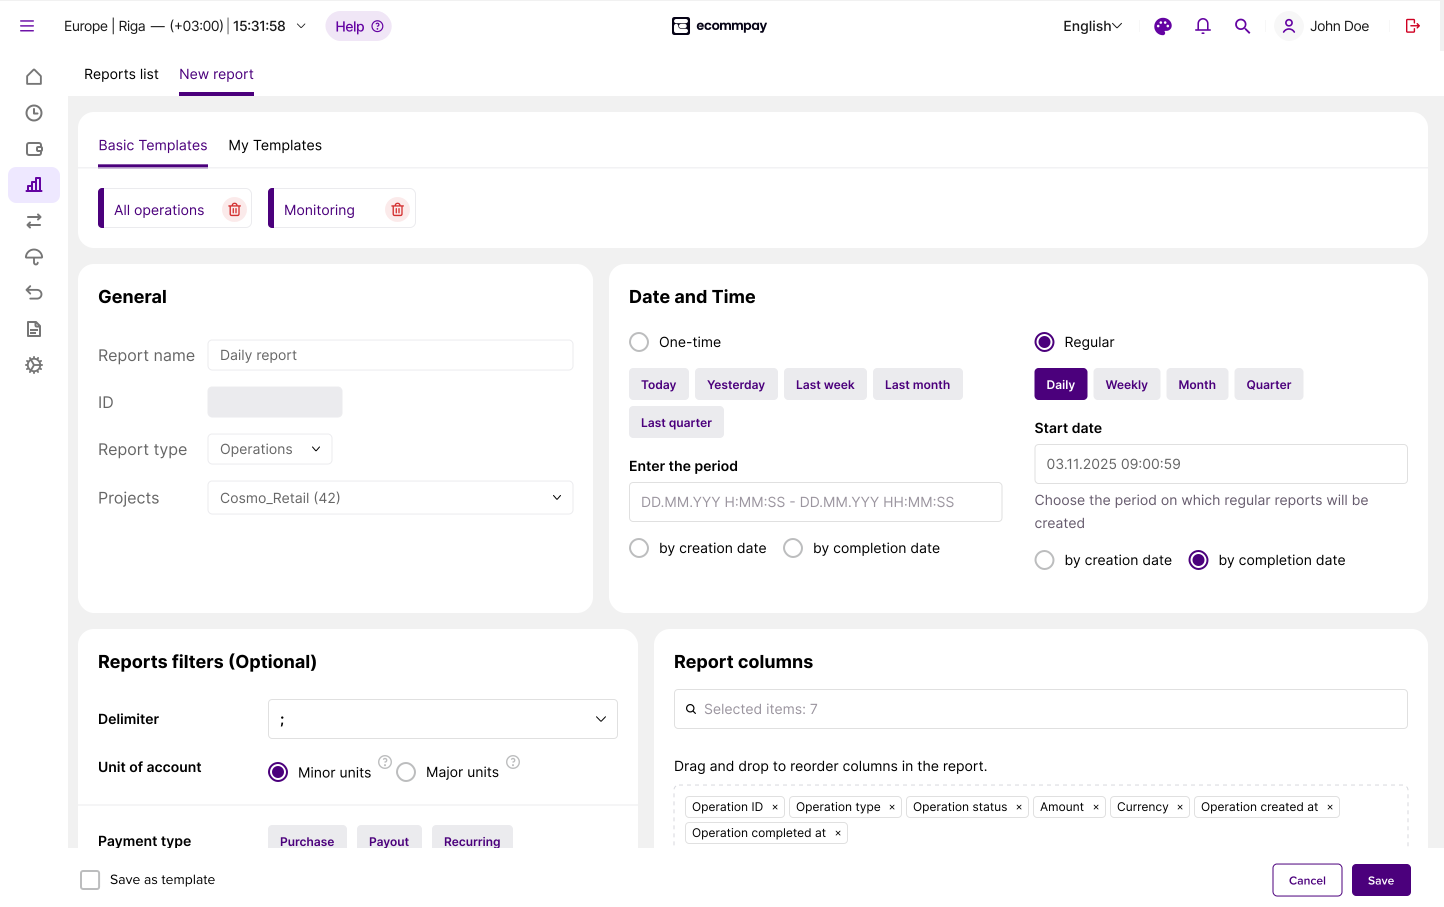
- If needed, save the configuration as a custom template by selecting the appropriateSave as template checkbox in the bottom left corner of the report creation tab.
- Send the request for generating the report by clicking Save.
To do so, click the Save button in the bottom right corner of the report creation tab. If validation fails, error messages appear next to the incorrectly completed fields, in which case, perform the required actions and resubmit the request.
- Make sure that the request to generate the report has been processed(a new record should appear in the reports list) and, if needed, download the report by clicking the button.
You will be redirected from the report configuration tab to the reports list where a record for the created report appears. The record status is indicated by one of the following icons:
indicates that the file is ready for download, while indicates that there is no relevant data in the platform that matches the report configuration.
Downloading a report
Generated report files are available for download via the reports list for four days after their generation, after which they are deleted from the platform and become unavailable.
To download a report file to your device, click the icon in the corresponding row of the reports list. Then, in the window that opens, select the folder where you want to save the file.
To download a report file that is no longer accessible because its retention time has expired, you need to regenerate it. To regenerate a one-time report, click the icon in the corresponding row of the reports list and, in the report configuration tab that opens, confirm the regeneration. To regenerate a regular report, create an identical one-time report using the regular report's configuration. After that, you can download the newly created file from the corresponding row of the reports list.
Working with a downloaded report
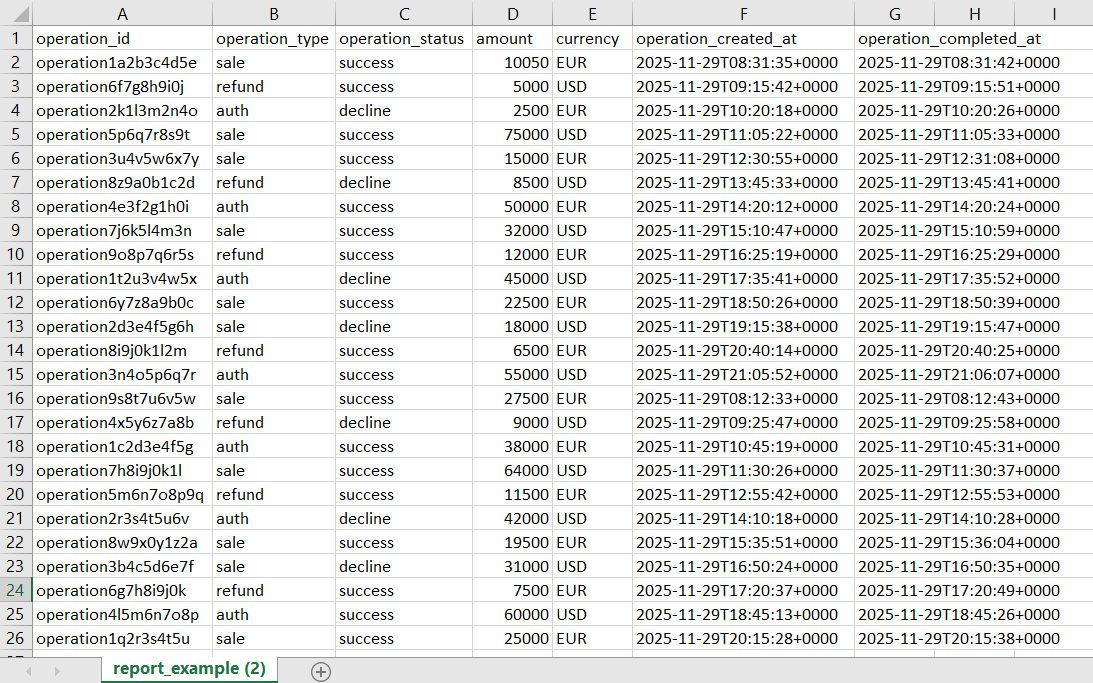
Keep in mind that in downloaded reports, the decimal separator in numbers is a dot ("."), while in some spreadsheet applications, such as Microsoft Excel, for example, the default separator may be a comma (","). Hence, when Excel opens a CSV file, it may convert numbers into dates due to the separator mismatch. In such cases, it is recommended that you either change the separator settings in your spreadsheet editor or use alternative software to work with the downloaded reports. Make sure the separator is correctly interpreted by the software you use.
The following is an example of a report file with semicolons (";") as parameter delimiters and dots (".") as decimal separators.

Apart from the separator settings, report files conform to a standard CSV format and can be processed in any way you choose.
Pausing and resuming regular reports
In the reports list, you can pause and resume the generation of regular reports. Keep in mind that if a report was not generated due to a pause in recurring reporting, it cannot be retrospectively recovered within the same series, even after the series is resumed. Resuming a series only triggers the generation of new reports according to the schedule from the point of resumption onwards. To recover reports that were not generated due to a pause, you can create the corresponding one-time reports.
To pause, locate any record in the reports list that is related to the series (even if it is not the most recent), toggle the  switch to set it to inactive and confirm the action. To resume, toggle the switch again to set it back to active.
Deleting a report record
To maintain the reports list current and up to date, you can delete obsolete records in it, for example, records of test reports or reports configured with errors. When deleting records, keep in mind the following:.
- Records can be deleted only one at a time.
- Deleted records cannot be recovered.
- Deleting records for regular reports does not affect the generation of subsequent reports in the series.
- Automatic deletion of records (for example, after a specified period) is not supported.
To delete an obsolete record, click  in the corresponding row of the reports list and make sure that the record is no longer shown.
Working with report configurations
Creating and editing a configuration
Dashboard allows you to create and edit various configurations that you can use as the basis for generating new reports. Note that a new configuration can only be created as part of the report creation process (details).
Saving a configuration as a template
When creating a report, you can save its completed configuration as a template and apply it to new reports you create in the future. This can be particularly useful when you need to create multiple reports with a similar set of parameters.
There is no limit on the number of templates you can save; however, they are available only to your user account because Dashboard does not support template import and export.
To save a configuration as a template, select the appropriateSave as template checkbox in the bottom left corner of the report creation tab (details).
Deleting a template
In Dashboard, you can delete custom templates from the My templates tab. Note that templates can be deleted only one at a time and this action is irreversible. Hence, if you need to restore a deleted template, you will have to create a new one—for example, based on the configuration of a report that was previously generated using that template (details).
- Open a report configuration tab—either for an existing report or create a new one.
To do so, click Create on the left of the filtering panel or click
in any row of the reports list. - Locate the template to be deleted on the Templates panel.
To do so, open the Templates panel at the top of the report configuration tab and then open the My templates tab.
- Delete the template by clicking the icon next to its name.