Using plug-in from Ecommpay for Magento CMS
An article about using a plug-in for embedding Payment Page into websites powered by the Magento CMS platform.
Overview
This article covers the information about using the payment plug-in from Ecommpay version 2.1.6. This plug-in can be used in web services that are based on the Magento CMS version 2.2 or later and allows opening the Payment Page payment form of Ecommpay for customers and ensuring all necessary actions for payment processing.
The plug-in from Ecommpay allows opening the Payment Page payment form of Ecommpay for customers and ensuring all necessary actions for payment processing with regard to the interaction with both customers and the Ecommpay payment platform (with all necessary information sent and received).
General information
Capabilities
With the plug-in from Ecommpay, the following is available:
- Setting up the capability to open the Payment Page payment form of Ecommpay in the web service.
For this, you only need to install the plug-in from Ecommpay and set up its usage in the Magento CMS interface.
- Setting up the usage of separate payment methods available in the merchant's project.
You can do this directly via the corresponding accordion items in the Magento interface. Technically, for using different payment methods, you may need to either configure a minimum of the plug-in parameters or take no actions at all, while all organisational issues can be resolved in cooperation with the Ecommpay account manager.
- Setting up the design of the merchant's web service with the use of Hyvä Themes and integrating the Payment Page payment form of Ecommpay into Hyvä Checkout.
For this, you only need to install the required plug-ins in addition to the plug-in from Ecommpay and set up its usage in the Magento CMS interface.
- Testing the operation of the payment form and the capabilities of payment processing.
For initial testing, you can just use the plug-in test mode (with no additional actions required), while for deeper testing, you can get a test project in the Ecommpay payment platform (by submitting an application on the company's main site).
- Processing one-time one-step or two-step purchases.
Within a single project, you can select one option to process purchases: when funds are debited immediately (in one step) using any of the set up payment methods or when funds are first authorised and then either withdrawn or released (in two steps) using any of the methods which support processing of such purchases via Payment Page.
- Issuing partial and full refunds for purchases, which were processed with the help of the plug-in, as part of the work with methods for which refunds are supported.
For this, you can use the Magento interface and, if relevant, interfaces of the Ecommpay payment platform (the user interface Dashboard and the Gate API). Along with that, when using the interfaces of the Ecommpay payment platform, payment information in the Magento interface is updated only if conditions for sending callbacks from the payment platform have been configured (details).
- Monitoring the information about payments processed with the help of the plug-in.
For this, you can use the Magento interface and if relevant—the Dashboard interface from Ecommpay. Along with that, it should be considered that in situations when refunds are made via Gate or Dashboard, the information may not be updated in the Magento interface.
- Managing orders with related purchases processed with the help of the plug-in—via the Magento interface.
This includes cancelling these orders and changing their statuses manually (if necessary).
- Configuring the parameters of the Payment Page operation and adjusting the form to the web service specifics, as well as using various capabilities provided by Ecommpay.
Particularly, you can use the payment confirmation procedure when working with Open Banking methods and set up sending notifications to customers about the purchased goods and services (details). To have these capabilities set up, contact the Ecommpay technical support specialists.
Such a wide range of capabilities allows you to adjust to various business specifics, flexibly configure user scenarios, and ensure a high rate of the payment form conversion and payment acceptance. For setting up and using the capabilities provided by Ecommpay, refer to the technical documentation on this portal and, if necessary, contact the Ecommpay specialists.
Workflows
The following diagrams illustrate the workflows of executing one-time one-step and two-step purchases with the use of the plug-in from Ecommpay. The workflows involve the customer, the merchant's web service with the built-in plug-in, the Payment Page payment form, the payment platform, and the payment environment. On the web service side, the opening of Payment Page is requested and automatic interaction with the payment platform is carried out in accordance with the plug-in parameters.
In case of one-step purchases, one initial request leads to a one-time transfer of funds from the customer to the merchant which is followed by a callback with the information about the payment result sent to the web service.

- On the web service side, the customer opens the checkout page and selects a purchase method available via the plug-in from Ecommpay.
- The request for opening the Payment Page payment form is automatically generated and sent to the payment platform via the plug-in, with regards to the method selected by the customer.
- The request for opening Payment Page is received in the payment platform.
- The request is processed in the payment platform and checked for correctness.
- The necessary actions are performed on the payment platform side to for displaying the payment form to the customer.
- The payment form is displayed to the customer.
- The customer completes the required actions for purchase and confirms the purchase.
- The final purchase request (with all necessary data) is received in the platform.
- The request is sent to the payment environment.
- The request is processed in the payment environment, and if necessary, additional actions are performed on the side of the platform and the customer (for example, for the 3‑D Secure authentication).
- The purchase result information is sent from the payment environment to the payment platform.
- The callback with the purchase result information is sent from the payment platform to the web service. The callback is automatically processed with the help of the plug-in, thus an invoice is generated and payment information is updated in the Magento interface.
- The purchase result information is sent from the payment platform to Payment Page.
- The purchase result information is displayed to the customer in the payment form.
In case of two-step purchases, based on an initial request (at the first step), the funds are held on the customer's account and then (at the second step), based on the next request or automatically after a specified period of time, the funds are transferred to the merchant or released. Along with that, at each step, a callback with the information about the corresponding result is sent to the web service.

- On the web service side, the customer opens the checkout page and selects a payment method available via the plug-in from Ecommpay.
- The request for opening the Payment Page payment form is automatically generated and sent to the payment platform via the plug-in, for processing the payment with use of the select payment method.
- The request for opening Payment Page is received in the payment platform.
- The request is processed in the payment platform and checked for correctness.
- The necessary actions are performed on the payment platform side to prepare for displaying the payment form to the customer.
- The payment form is displayed to the customer.
- The customer completes the required actions and confirms the purchase.
- The request for authorisation hold is received in the platform.
- The request is sent to the payment environment.
- The payment is processed and the funds are authorised in the payment environment. And if necessary, additional actions are performed on the side of the platform and the customer (for example, the 3‑D Secure authentication).
- The information about the authorisation hold result is sent from the payment environment to the payment platform.
- The callback with the information about the authorisation hold result is sent from the payment platform to the web service. The callback is automatically processed with the help of the plug-in, thus the payment information is updated in the Magento interface.
- The information about the authorisation hold result is sent from the payment platform to Payment Page.
- The information about the authorisation hold result is displayed to the customer on Payment Page.
- After it has been confirmed that the funds should be withdrawn, the merchant's specialist initiates the withdrawal, and as result, a request for withdrawing the funds is received and processed in the payment platform (which is done with the help of the plug-in).
- The request is sent to the payment environment.
- The payment is processed in the payment environment.
- The information about the withdrawal result is sent from the payment environment to the payment platform.
- The callback with the information about the withdrawal result is sent from the payment platform to the web service. The callback is automatically processed with the help of the plug-in, thus an invoice is generated and payment information is updated in the Magento interface.
- The customer is notified about the withdrawal result by the means of the web service.
For interaction with customers when processing one-step purchases and placing authorisation hold on funds for two-step purchases, the following options can be applied:
- with the payment form embedded directly in the web service interface (in an iframe element);
- with the payment form opened in a modal window or in a separate tab.
The first of these options is available only for purchases with the direct use of payment cards and is used for such purchases by default. In case of the firstthis option, the customer specifies payment card credentials and confirms the order, which is generated in the Magento CMS, and the payment, which is initiated in the Ecommpay platform, directly on the web service page for proceeding to payment (using the Place Order button).
The second of these options is used for all alternative payment methods and for purchases with the direct use of payment cards if these purchases are made with the payment form opened in a modal window or a separate tab. In case of the secondthis option, the customer first confirms the order, which is generated in the Magento CMS, on the web service page for proceeding to payment (using the Place Order button) and only after that specifies the necessary data in the payment form and confirms the payment, which is initiated in the Ecommpay platform, (using the Pay button).
Additionally, the second option allows for cases when the customer confirms the order but does not proceed to payment. In such cases, orders in the Pending Payment status appear in the web service with no purchases initiated for these orders. As to the rest, the work with orders and the corresponding payments is the same for both options.
You can monitor the information about orders and payments via the Magento interface: in the Orders subsection of the Sales section. Orders and payments have different identifiers and statuses. Orders on the web service side are assigned nine-digit numbers (for example, 000001503) and statuses used by Magento (details), while payments on the payment platform side are assigned identifiers that consist of the prefix mag_ and a code of thirteen characters (for example, mag_64ca3135cffd3) and statuses used by Ecommpay (details). With questions about the statues of payments and orders, contact the Ecommpay account manager.
Installation
General information
To start using the plug-in version 2.1.6 from Ecommpay for the Magento CMS, you need to install it. There are two ways to install the plug-in—via the plug-ins directory of Magento (without prior download of the plug-in files) or using the zip files of the plug-in (with the plug-in files downloaded beforehand).
If you encounter questions related to the plug-in installation, contact the Ecommpay technical support specialists.
Installation via the plug-ins directory
To install the plug-in via the directory, proceed as follows:
- Execute the command
composer require ecommpay/module-paymentsfrom the root folder with the Magento CMS files. - If necessary, obtain and specify the authentication key to access the integration modules on the Magento CMS side.
- Execute the following commands from the root folder with the Magento CMS files and wait for the installation completion.
php bin/magento setup:upgrade
php bin/magento cache:flush
php bin/magento cache:clean
php bin/magento setup:di:compile
php bin/magento setup:static-content:deploy
Installation using the plug-in zip file
To install the plug-in using the plug-in zip file, proceed as follows:
- Download the zip file from GitHub.
- Unzip the folder with the plug-in files and add it to the folder with the source code of the web service built on the Magento CMS—specifically, to the
app/codesubfolder.Notice:If before the plug-in installation, one of its earlier versions has been used and not deleted, the folder with the files of this version should be deleted from the folder with the web service source code before the folder with the new version will be added.
Also note that, depending on the structure of the folder with the web service source code, additional actions may be required for connecting to this folder (for example, connecting via the SSH protocol).
- Execute the following commands from the root folder with the Magento CMS files and wait for the installation completion.
php bin/magento indexer:reindex
php bin/magento setup:upgrade
php bin/magento setup:di:compile
php bin/magento cache:flush
php bin/magento cache:clean
php bin/magento setup:static-content:deploy
Testing
Overview
For testing the plug-in operation and processing test payments without actual debiting of funds, there are the following options available:
- Testing in the plug-in test mode. This is the option to carry out local basic testing of the payment form operation and separate scenarios card paymentswithout connecting to the Ecommpay payment platform. It allows you to promptly check the payment form operation and separate scenarios of card payments. In this mode, the identifiers of test payments contain the code word
testand the domain name of the web service (for example,test_mysite_mag_64ca3135cffd3). This can be convenient for monitoring the processing of payments. - Testing in the test environment of the Ecommpay payment platform. This is the option to carry out integrated and fully-featured testing after connecting to the Ecommpay payment platform and setting up its components. You can connect to the platform within a few minutes by using the corresponding form on the company's main site and the received identifier and key of the test project. In this case, the plug-in is switched to the production mode and allows you to test a greater number of payment scenarios, including payments via alternative methods available for testing (details). All payments remain not real (although, their identifiers do not contain the code word
testand the domain name of the web service).
To compare the two testing options, refer to the following table.
| Testing capabilities | in the plug-in test mode | in the test environment of the platform |
|---|---|---|
| Opening the payment form using various options and parameters of its operation | + | + |
| Processing one-time purchases (in one and two steps) | + | + |
| Using alternative payment methods (as coordinated with the Ecommpay specialists) | – | + |
| Using addition capabilities of the Payment Page payment form (as coordinated with the Ecommpay specialists) | – | + |
| Issuing refunds | + | + |
| Monitoring payment information | + | + |
| Managing orders | + | + |
Regardless of the selected testing option (in the test mode or via the test environment of Ecommpay), the plug-in is connected to the web service and becomes available to customers as the payment option. Thus, Regardless of the selected testing option, in cases when the plug-in is connected to a web service that operates in live mode, it is recommended to ensure that testing takes place during a low-load period and notify the customers about the ongoing testing activities.
Parameters setup
To prepare the plug-in for testing, decide on the preferable testing option and set up the plug-in in the Magento interface as follows:
- Go to the plug-in parameters in the Magento interface.
For this, proceed as follows:
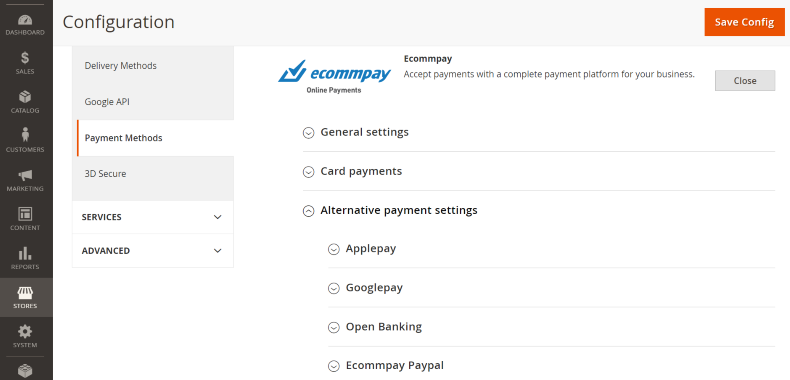
- Select the Stores section in the navigation menu and the Configuration item in the menu that appears.
- Select the Sales section and the Payment Methods item in the left menu of the Configuration subsection.
- Find the section with the plug-in operation parameters on the page that opens and click the Configure button.
- Set up the basic parameters of the plug-in operation in the accordion item General settings:
- Plugin Enabled—the feature for enabling the plug-in in the web service.
If this parameter is set to Yes, then all payment methods previously enabled for working via the plug-in become available in the web service. If the parameter is set to No, then all payment methods are disabled in the web service and unavailable for payment processing.
- Demo mode—the feature for switching the plug-in operation mode.
For using the test mode of the plug-in, set the Yes value, for using the test environment of the platform—set the No value and specify the parameters for connecting to the test environment received from Ecommpay in the fields Project ID and Secret Key.
Note: When the plug-in test mode is enabled, the values specified in the fields Project ID and Secret Key are ignored. Thus, to use the project of the Ecommpay payment platform, you should disable the plug-in test mode. - Project ID—the test project identifier.
- Secret Key—the test project key for interacting with the platform.
- Language—the language in which the payment form is displayed.
- Additional parameters—additional parameters for opening payment form. When specifying several parameters in this field, use the & symbol as a separator.
- Payment action—the option to process purchases:
Authorize (for two-step purchases) or Authorize and Capture (for one-step purchases).
- Authorize — in two steps (with debiting after authorisation hold);
- Authorize and Capture — in one step (with immediate debiting of funds).
The first option is supported only for card payments and for the Apple Pay and Google Pay methods, while the second option is supported for all payment methods available via the plug-in.
Figure 5. The accordion item General settings with basic parameters for setup 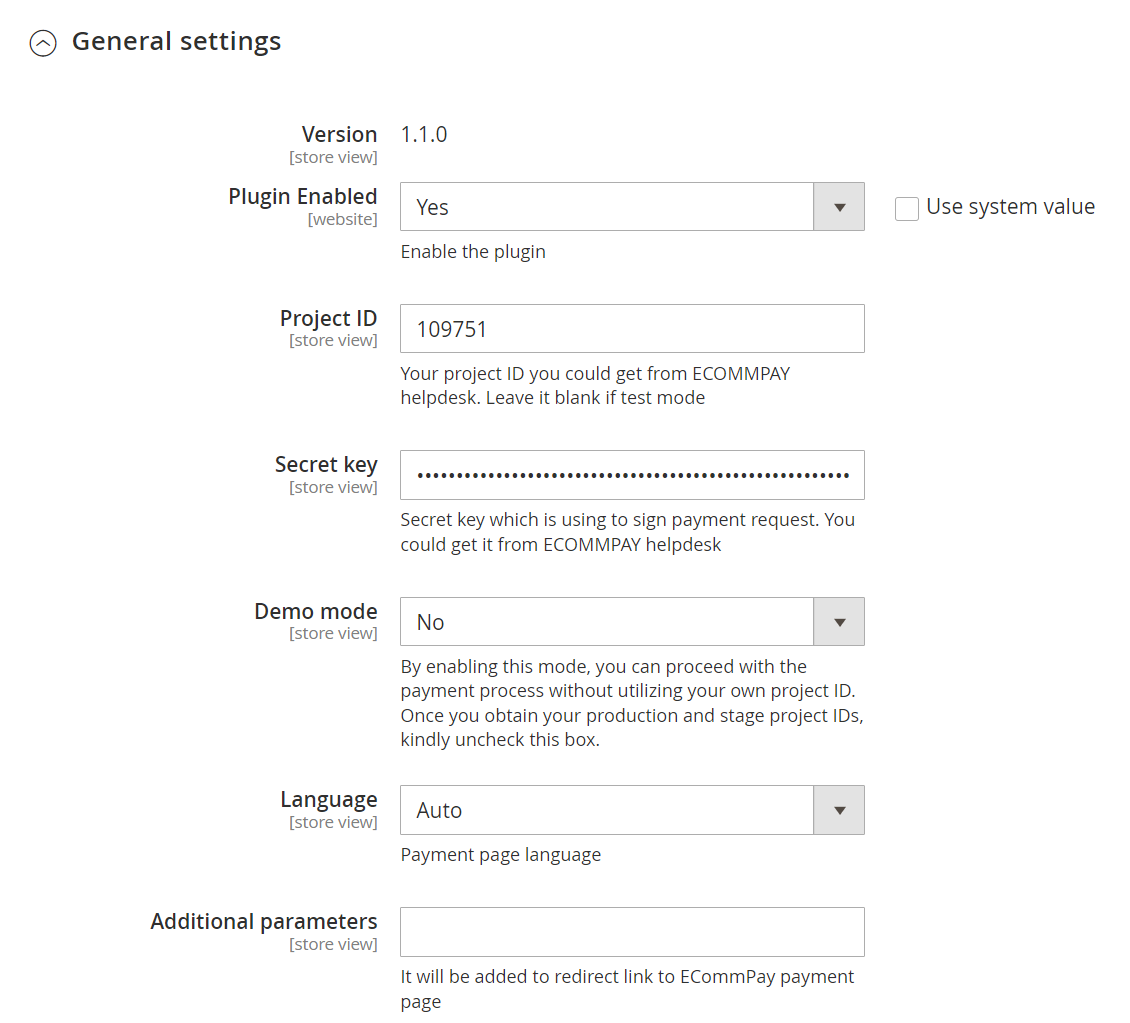
- Plugin Enabled—the feature for enabling the plug-in in the web service.
- Set up the parameters for using payment methods (details).
Working in the test mode of the plug-in, you only need to set up the parameters for card payments in either of the accordion items—Card payments or More payment methods via Ecommpay.
- Save the parameters of the plug-in operation.
For this, click the Save Config button.
Processing test purchases
Overview
When testing the plug-in operation, you can process test purchases in the web service and obtain basic information about them via the Magento interface. in the Orders subsection of the Sales section. Along with that, you can use special payment credentials that allow testing particular payment scenarios.
To test card payments, you can use the numbers of test cards. For testing according to the shortest scenarios (without the emulation of the 3‑D Secure authentication), the following numbers of cards can be used:
4000 0000 0000 0077—for a purchase to be processed;4111 1111 1111 1111—for a purchase to be declined.
For more comprehensive testing, it is possible to use extended test data for card payments (details). (including scenarios with the 3‑D Secure authentication) provided in the Test cards article.
To test payments using alternative payment methods (with these methods set up through an account manager or the technical support specialists in the test environment of payment platform), you can use the information provided in the Testing article and in the sections about testing particular payment methods.
Ensuring data synchronisation
When working with two-step purchases, the second steps can be initiated both via the Magento interface and via the interfaces of the Ecommpay payment platform (Dashboard and the Gate API). In case of the Ecommpay interfaces, the order information in the Magento interface is updated only if conditions that trigger callbacks from the payment platform have been configured. Thus, if the merchant needs to issue refunds via the Ecommpay platform interfaces and monitor the payment information via the Magento interface, it is important to ensure that callbacks can be sent and received for automatic updates of information in the Magento interface. For this, the following conditions must be met:
When working with two-step purchases, the second steps can be initiated both via the Magento interface and via the interfaces of the Ecommpay payment platform. In case of the Ecommpay interfaces, it is important to ensure automatic updates of information in the Magento interface. For this, the following conditions must be met:
- For the project in use, conditions that trigger callbacks sent from the payment platform to the CMS Magento(to the URL in the format
https://<merchant domain>/ecommpay/endpayment/index) are configured.Information about working with conditions for sending callbacks is provided in a separate article.
- The configured conditions for sending callbacks do not have duplicates with the same payment type, event type, and payment method code.
Otherwise, the plug-in logs display error messages related to processing of callbacks received from the payment platform.
Procedures
A one-step purchase, as well as the first step of a two-step purchase (authorisation hold), is initiated by the customer when they confirm the payment. A one-step purchase is processed automatically, while for a two-step purchase, only the first step, authorisation hold, is initiated automatically and after that the second step, withdrawal or release of funds, can be made. The second step can also be initiated automatically (after a specified authorisation period) or upon the merchant's request—via the Magento interface or the interfaces of the Ecommpay payment platform: Dashboard (details) and the Gate API (details). Along with that, withdrawals upon requests can be made not only for the entire authorised amount but also for a part of this amount.
To initiate the second step of a purchase via the Magento interface, proceed as follows:
- Go to the orders register.
For this open the Sales section and select the Orders item in the menu that appears.
- Select an order within which the second step of the purchase should be initiated.
- Initiate the second step of the purchase.
For withdrawing the authorised funds, proceed as follows:
- Click the Invoice button in the top menu of the order tab.
- Ensure that, on the page that opens, the number of products for which the funds should be withdrawn is specified in the Qty to Invoice column.Note: Take into consideration that, when a partial amount is withdrawn, the rest is automatically released and returned to the customer.
- Ensure that, for the Amount parameter in the bottom part of the page, the Capture Online value is selected and click the Submit Invoice button.
For releasing the authorised funds, click the Void button in the top part of the order tab and confirm the action in the dialogue box that appears.
For setting up automatic initiation of the second step of two-step purchases, contact the Ecommpay technical support specialists.
Processing test refunds
Overview
After processing test purchases, you can make test refunds via the Magento interface and, if relevant, via Gate and Dashboard from Ecommpay. Along with that, keep in mind that refunds can be made in case if orders in the Magento interface have the statuses Processing or Complete and if payments in the Ecommpay payment platform have the statuses success, partially reversed, or partially refunded. Also, you can take into consideration that all information provided in this subsection is as well relevant for issuing refunds in the production environment.
Ensuring data synchronisation
When refunds are initiated via the interfaces of the Ecommpay payment platform (Dashboard and the Gate API), order information in the Magento interface is updated only if conditions that trigger callbacks from the payment platform have been configured. Thus, if the merchant needs to issue refunds via the Ecommpay platform interfaces and monitor the order information via the Magento interface, it is important to ensure that callbacks can be sent and received for automatic updates of information in the Magento interface. For this, the following conditions must be met:
If the merchant needs to issue refunds via the Ecommpay platform interfaces, it is important to ensure automatic updates of information in the Magento interface. For this, the following conditions must be met:
- For the project in use, conditions that trigger callbacks sent from the payment platform to the CMS Magento(to the URL in the format
https://<merchant domain>/ecommpay/endpayment/index) are configured.Information about working with conditions for sending callbacks is provided in a separate article.
- The configured conditions for sending callbacks do not have duplicates with the same payment type, event type, and payment method code.
Otherwise, the plug-in logs display error messages related to processing of callbacks received from the payment platform.
Procedures
Refunds are available for purchases that have been processed and not fully refunded. On the Ecommpay payment platform side, such purchases have the statuses success, partially reversed, and partially refunded. You can monitor the processing of refunds via the interfaces of the Ecommpay and Magento platforms.
To make a refund via the Magento interface, proceed as follows:
- Open the orders register.
For this, open the Sales section and select the Orders item in the menu that appears.
- Select the order that should be refunded, select the Invoices item in the left menu of the order tab.
- Select an invoice within which the payment has been processed and click the Credit Memo button in the upper menu of the invoice page.
- Specify the number of the items that should be returned and, if necessary, click the Update Qty's button for updating the refund amount on the page for making refunds—New Memo.
- If necessary, specify the reason for the refund in the Credit Memo Comments field.
- Confirm the refund.
For this, click the Refund button.
- Ensure that the order history contains the information about the made refund.
In case of a partial refund, the order is assigned the status
Processing, while in case of a full refund, it is assigned the statusClosed.
To make a refund via the Gate API or Dashboard of the Ecommpay platform, use the procedures provided in the corresponding articles: Purchase refunds (for the Gate API) and Issuing refunds (for the Dashboard interface).
In case of refunds via the Magento interface, the records with the information about these refunds (credit memos) are generated in this interface. You can view such records via the Credit Memos section in separate order tabs, while more detailed information about refunds can be obtained via the interfaces of the Ecommpay payment platform (for example, Dashboard and Data API).
Usage
Overview
In order to process payments with actual debiting of funds, you should initially solve all organisational issues related to the interaction with Ecommpay (submit the application for connecting to the payment platform, provide all necessary information, and receive a notification from Ecommpay about the possibility to process payments, as well as the identifier and secret key of the production project). Along with that, it is necessary to provide the Ecommpay technical support specialists with the name and URL of the web service for which the plug-in from Ecommpay is set up and the currency in which payments are to be processed.
After that, you can switch the plug-in to the production mode, specify the received identifier and secret key of the production project received from Ecommpay in the parameters of the plug-in operation and set up other necessary parameters. (or check whether the current setup is relevant for working in real-life conditions). If, after the setup, you need to suspend the plug-in operation, for example, to test some additional features, the plug-in can be switched to the test mode or disabled.
Parameters setup
To set up the plug-in parameters, proceed as follows:
- Go to the plug-in parameters in the Magento interface.
For this, proceed as follows:
- Select the Stores section in the navigation menu and the Configuration item in the menu that appears.
- Select the Sales section and the Payment Methods item in the left menu of the Configuration subsection.
- Find the section with the plug-in operation parameters on the page that opens and click the Configure button.
- Set up the basic parameters of the plug-in operation in the accordion item General settings:
- Plugin Enabled—the feature for enabling the plug-in in the web service.
If this parameter is set to Yes, then all payment methods previously enabled for working via the plug-in become available in the web service. If the parameter is set to No, then all payment methods are disabled in the web service and unavailable for payment processing.
- Demo mode—the feature for switching the plug-in operation mode.
For using the production environment of the platform, set the No value and specify the parameters for connecting to the production environment received from Ecommpay in the fields Project ID and Secret Key.
- Project ID—the test project identifier.
- Secret Key—the test project key for interacting with the platform.
- Language—the language in which the payment form is displayed.
- Additional parameters—additional parameters for opening payment form. When specifying several parameters in this field, use the & symbol as a separator.
- Payment action—the option to process purchases:
Authorize (for two-step purchases) or Authorize and Capture (for one-step purchases).
- Authorize — in two steps (with debiting after authorisation hold);
- Authorize and Capture — in one step (with immediate debiting of funds).
The first option is supported only for card payments and for the Apple Pay and Google Pay methods, while the second option is supported for all payment methods available via the plug-in.
Figure 7. The accordion item General settings with basic parameters for setup
- Plugin Enabled—the feature for enabling the plug-in in the web service.
- Set up the parameters for using payment methods (details).
- Save the parameters of the plug-in operation.
For this, click the Save Config button.
Processing purchases
Overview
If the web service and the plug-in have been set up correctly, the processing of one-step purchases and authorisation hold on funds for two-step purchases are performed automatically. Along with that, it is important to ensure that all necessary data is collected on the web service side.
In case of questions or issues related to purchase processing, contact the Ecommpay technical support specialists.
Ensuring data synchronisation
When working with two-step purchases, the second steps can be initiated both via the Magento interface and via the interfaces of the Ecommpay payment platform (Dashboard and the Gate API). In case of the Ecommpay interfaces, the order information in the Magento interface is updated only if conditions that trigger callbacks from the payment platform have been configured. Thus, if the merchant needs to issue refunds via the Ecommpay platform interfaces and monitor the payment information via the Magento interface, it is important to ensure that callbacks can be sent and received for automatic updates of information in the Magento interface. For this, the following conditions must be met:
When working with two-step purchases, the second steps can be initiated both via the Magento interface and via the interfaces of the Ecommpay payment platform. In case of the Ecommpay interfaces, it is important to ensure automatic updates of information in the Magento interface. For this, the following conditions must be met:
- For the project in use, conditions that trigger callbacks sent from the payment platform to the CMS Magento(to the URL in the format
https://<merchant domain>/ecommpay/endpayment/index) are configured.Information about working with conditions for sending callbacks is provided in a separate article.
- The configured conditions for sending callbacks do not have duplicates with the same payment type, event type, and payment method code.
Otherwise, the plug-in logs display error messages related to processing of callbacks received from the payment platform.
Procedures
A one-step purchase, as well as the first step of a two-step purchase (authorisation hold), is initiated by the customer when they confirm the payment. A one-step purchase is processed automatically, while for a two-step purchase, only the first step, authorisation hold, is initiated automatically and after that the second step, withdrawal or release of funds, can be made. The second step can also be initiated automatically (after a specified authorisation period) or upon the merchant's request—via the Magento interface or the interfaces of the Ecommpay payment platform: Dashboard (details) and the Gate API (details). Along with that, withdrawals upon requests can be made not only for the entire authorised amount but also for a part of this amount.
To initiate the second step of a purchase via the Magento interface, proceed as follows:
- Go to the orders register.
For this open the Sales section and select the Orders item in the menu that appears.
- Select an order within which the second step of the purchase should be initiated.
- Initiate the second step of the purchase.
For withdrawing the authorised funds, proceed as follows:
- Click the Invoice button in the top menu of the order tab.
- Ensure that, on the page that opens, the number of products for which the funds should be withdrawn is specified in the Qty to Invoice column.Note: Take into consideration that, when a partial amount is withdrawn, the rest is automatically released and returned to the customer.
- Ensure that, for the Amount parameter in the bottom part of the page, the Capture Online value is selected and click the Submit Invoice button.
For releasing the authorised funds, click the Void button in the top part of the order tab and confirm the action in the dialogue box that appears.
For setting up automatic initiation of the second step of two-step purchases, contact the Ecommpay technical support specialists.
Issuing refunds
Overview
After processing test purchases, you can make refunds via the Magento interface and, if relevant, via the Gate API and Dashboard from Ecommpay. Along with that, keep in mind that refunds can be made in case if orders in the Magento interface have the statuses Processing or Complete and if payments in the Ecommpay payment platform have the statuses success, partially reversed, or partially refunded. Also, you can take into consideration that all capabilities and procedures of working with refunds in the production mode correspond to those available in the test mode.
Ensuring data synchronisation
When refunds are initiated via the interfaces of the Ecommpay payment platform (Dashboard and the Gate API), order information in the Magento interface is updated only if conditions that trigger callbacks from the payment platform have been configured. Thus, if the merchant needs to issue refunds via the Ecommpay platform interfaces and monitor the order information via the Magento interface, it is important to ensure that callbacks can be sent and received for automatic updates of information in the Magento interface. For this, the following conditions must be met:
If the merchant needs to issue refunds via the Ecommpay platform interfaces, it is important to ensure automatic updates of information in the Magento interface. For this, the following conditions must be met:
- For the project in use, conditions that trigger callbacks sent from the payment platform to the CMS Magento(to the URL in the format
https://<merchant domain>/ecommpay/endpayment/index) are configured.Information about working with conditions for sending callbacks is provided in a separate article.
- The configured conditions for sending callbacks do not have duplicates with the same payment type, event type, and payment method code.
Otherwise, the plug-in logs display error messages related to processing of callbacks received from the payment platform.
Procedures
Refunds are available for purchases that have been processed and not fully refunded. On the Ecommpay payment platform side, such purchases have the statuses success, partially reversed, and partially refunded. You can monitor the processing of refunds via the interfaces of the Ecommpay and Magento platforms.
To make a refund via the Magento interface, proceed as follows:
- Open the orders register.
For this, open the Sales section and select the Orders item in the menu that appears.
- Select the order that should be refunded, select the Invoices item in the left menu of the order tab.
- Select an invoice within which the payment has been processed and click the Credit Memo button in the upper menu of the invoice page.
- Specify the number of the items that should be returned and, if necessary, click the Update Qty's button for updating the refund amount on the page for making refunds—New Memo.
- If necessary, specify the reason for the refund in the Credit Memo Comments field.
- Confirm the refund.
For this, click the Refund button.
- Ensure that the order history contains the information about the made refund.
In case of a partial refund, the order is assigned the status
Processing, while in case of a full refund, it is assigned the statusClosed.
To make a refund via the Gate API or Dashboard of the Ecommpay platform, use the procedures provided in the corresponding articles: Purchase refunds (for the Gate API) and Issuing refunds (for the Dashboard interface).
In case of refunds via the Magento interface, the records with the information about these refunds (credit memos) are generated in this interface. You can view such records via the Credit Memos section in separate order tabs, while more detailed information about refunds can be obtained via the interfaces of the Ecommpay payment platform (for example, Dashboard and Data API).
Monitoring payments and orders
Information about orders, including basic information about payments processed via the plug-in from Ecommpay, can be monitored in the Magento interface, via the tools of the Orders subsection in the Sales section. More detailed information about payments and refunds can be obtained via the Dashboard interface of Ecommpay (although the information about orders is not displayed in the interface).
The Orders subsection contains an orders register with main details about every order and with the capabilities of searching and filtering data, as well as opening the tabs of separate orders and performing various actions related to the them.
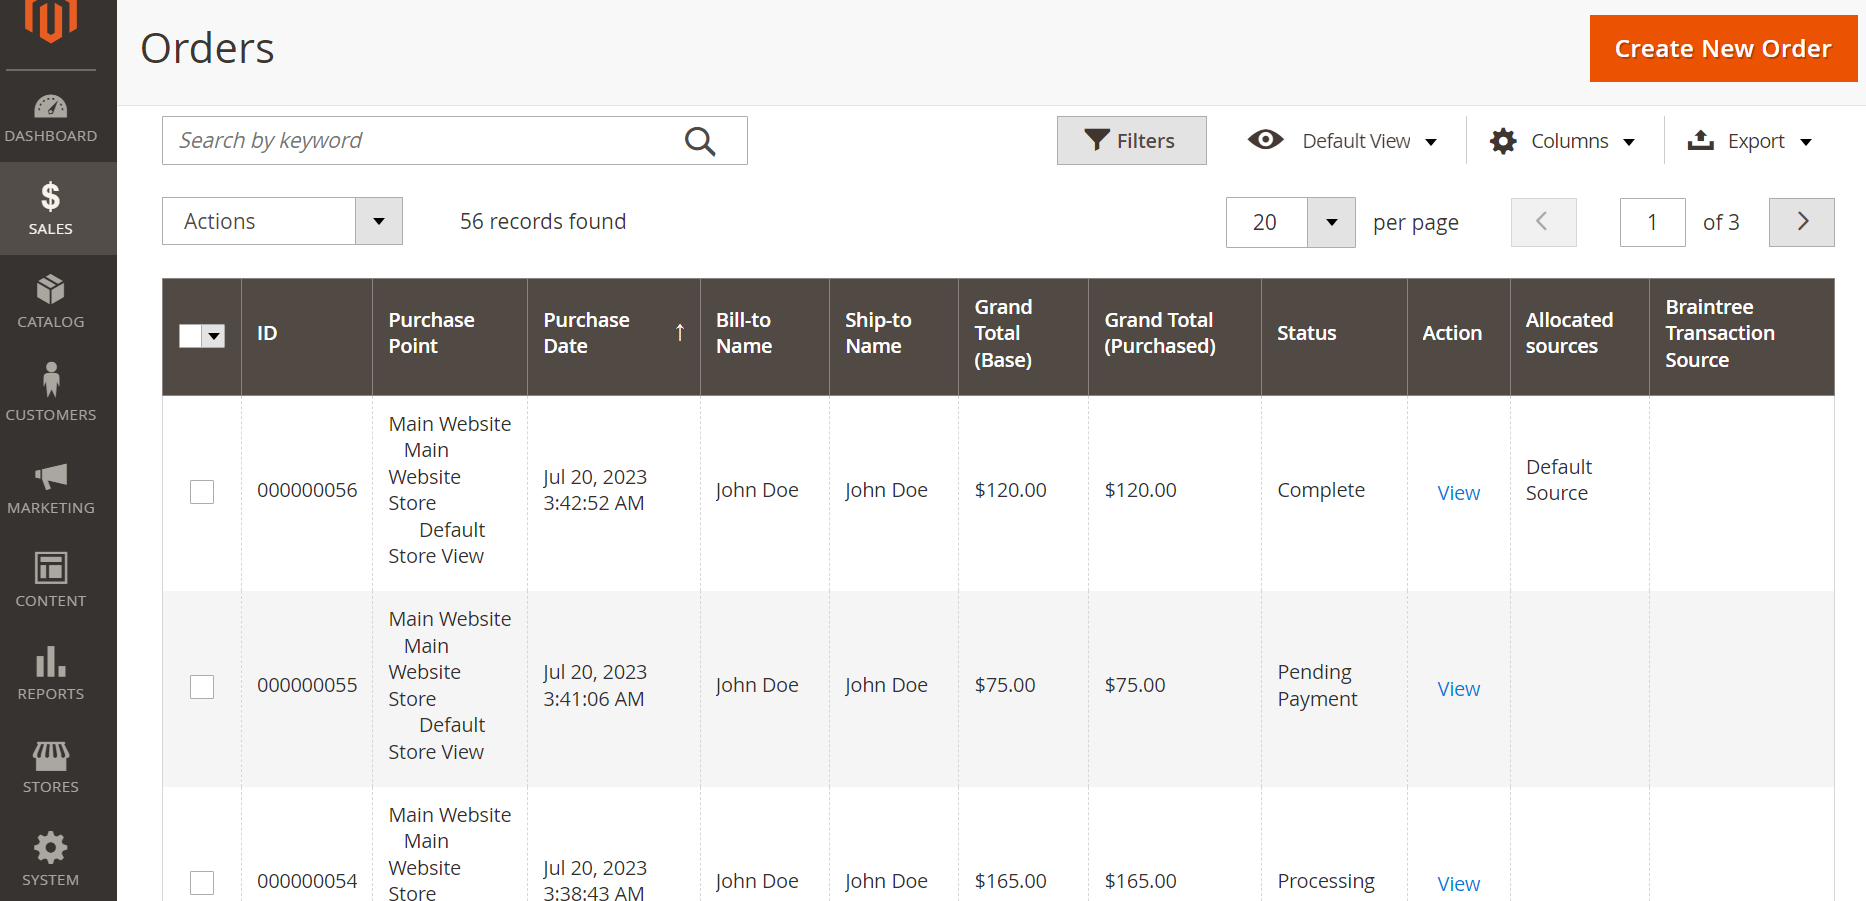
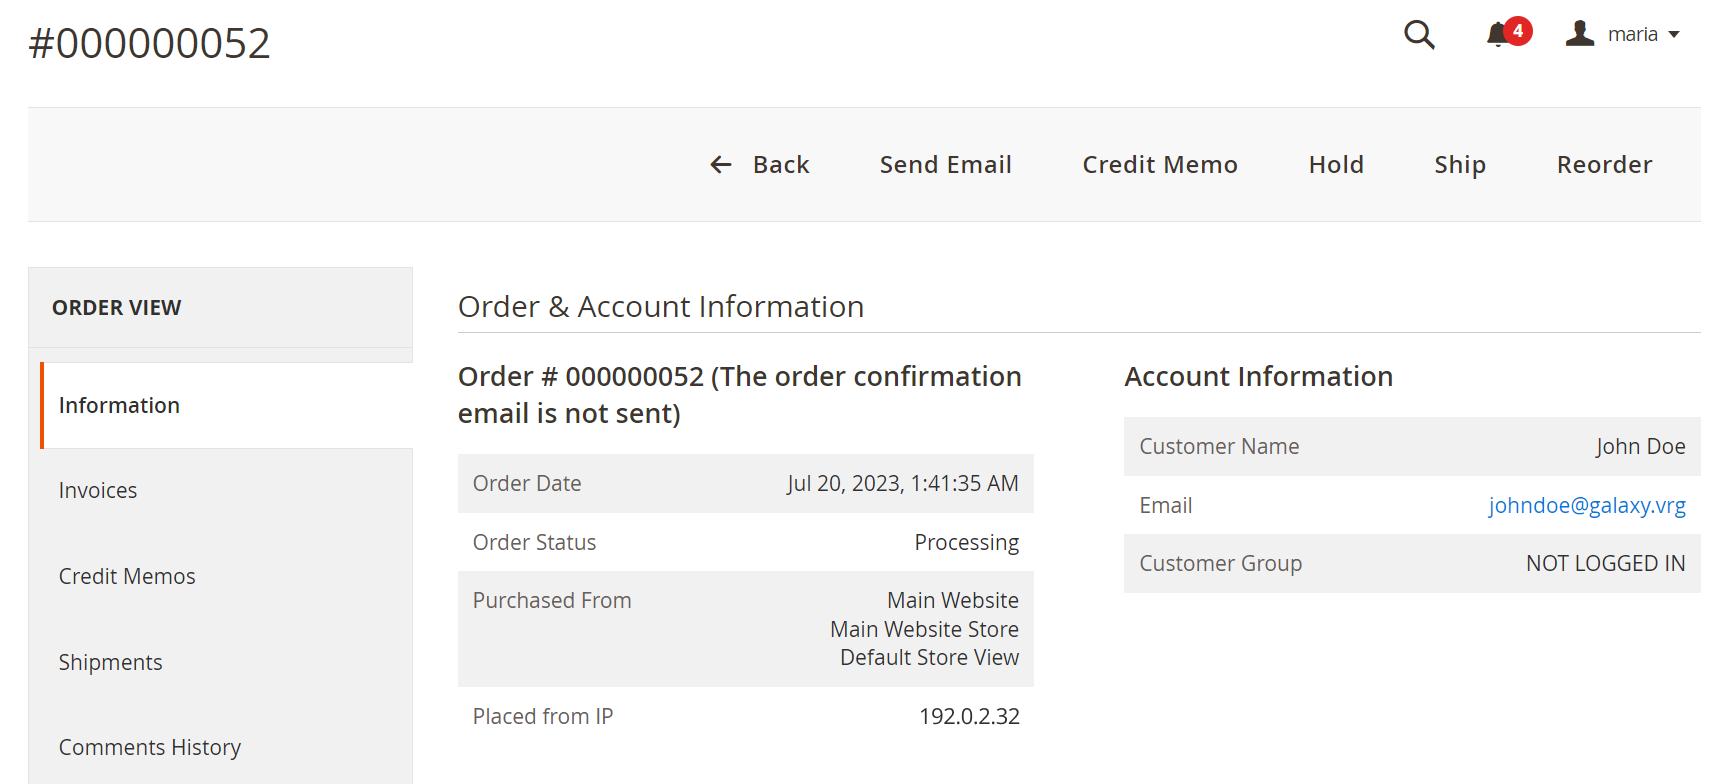
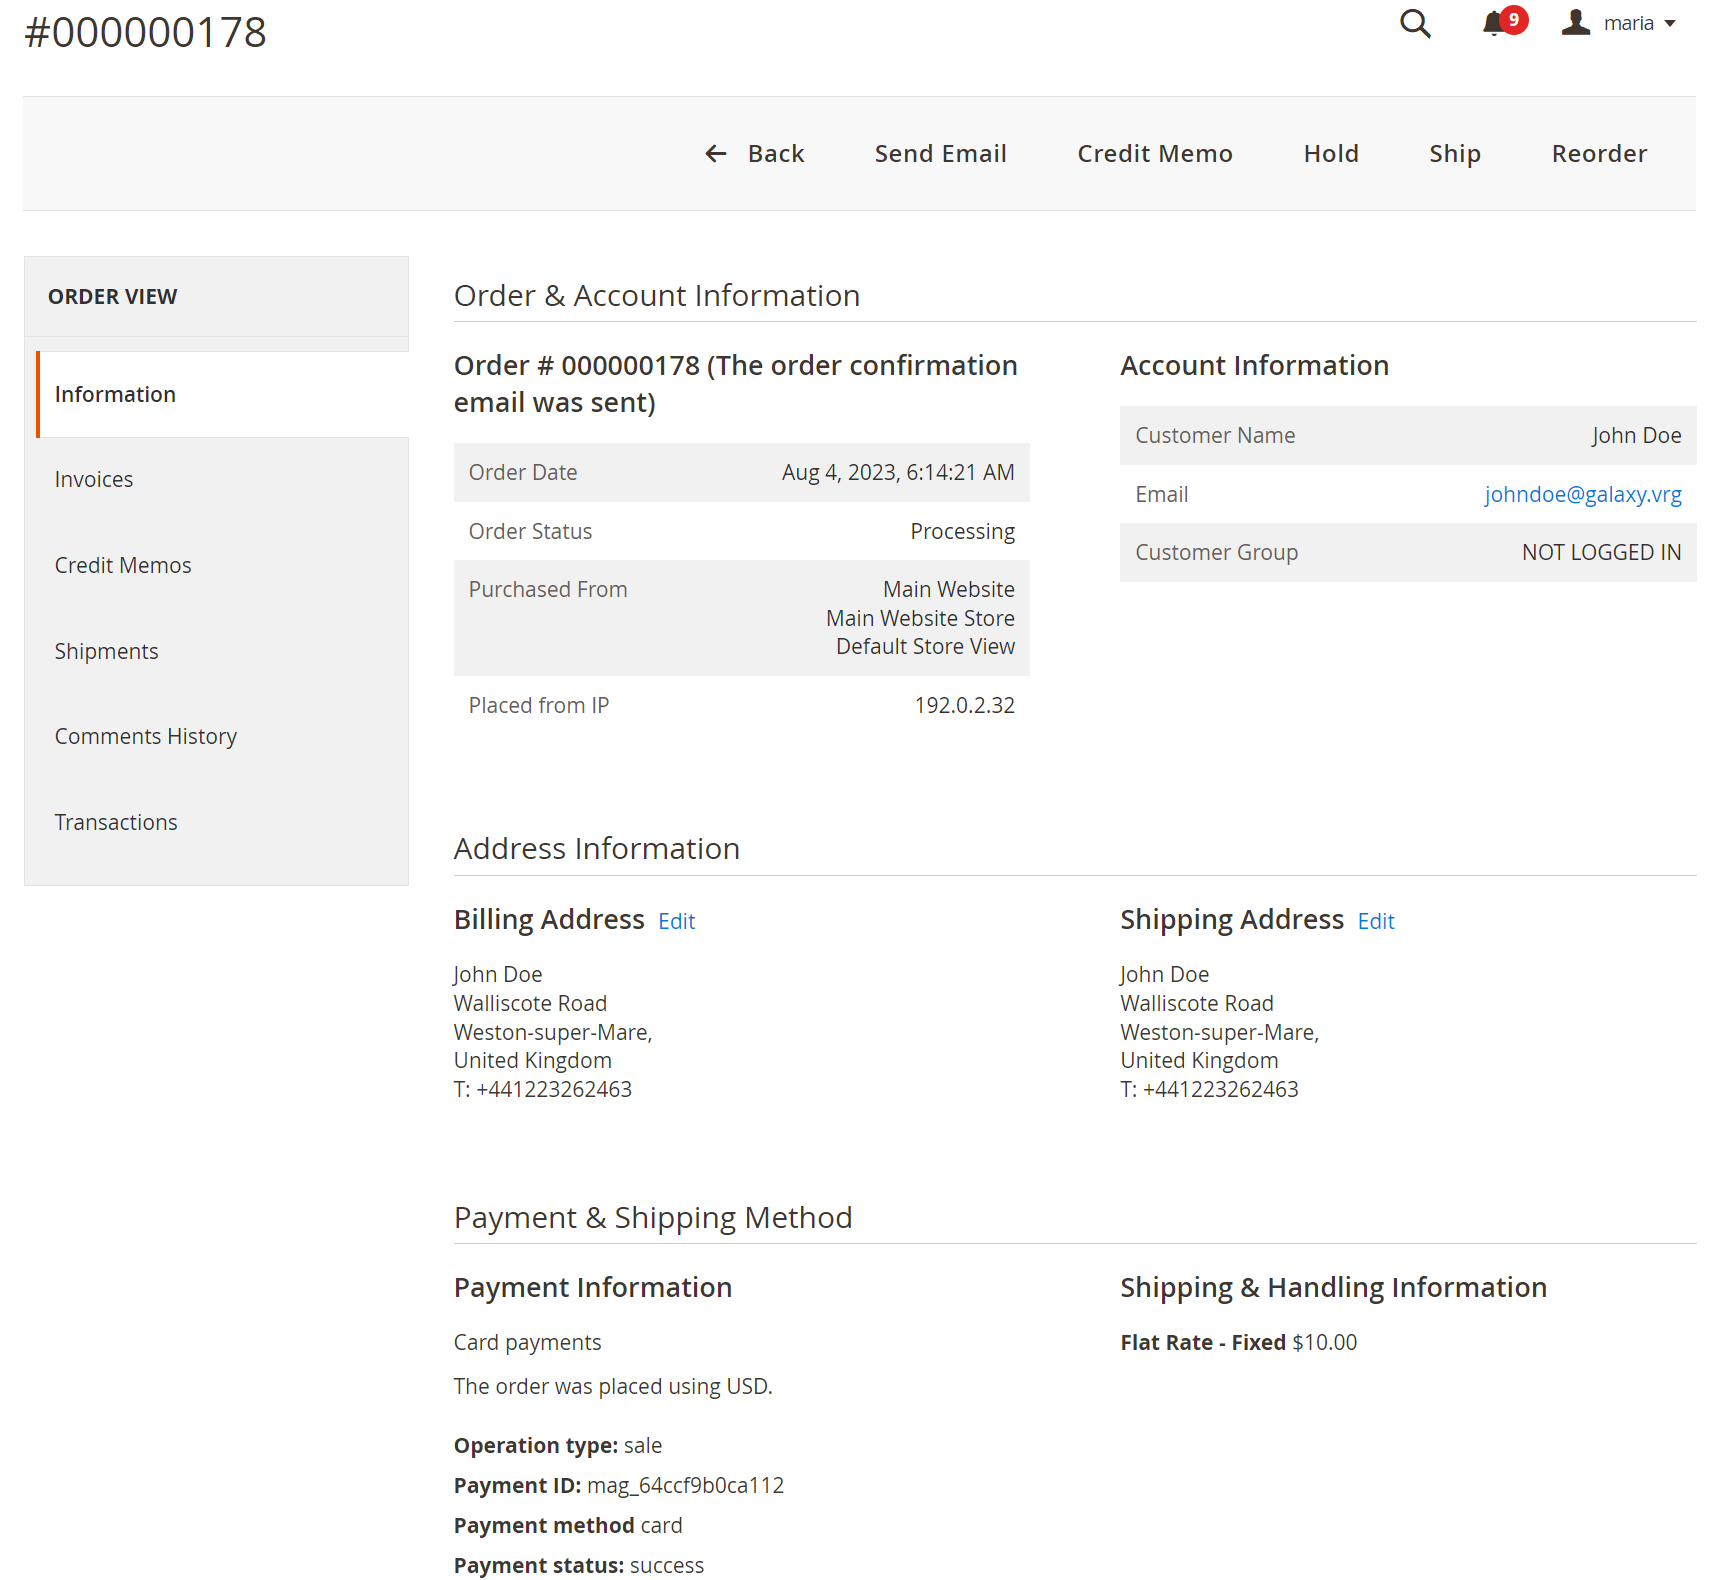
Clicking on an order's entry leads you to the order's tab containing To open a tab of a particular order, click on the order's entry in the register. The tabs contain the details about orders (such as the date of creation, the status, the amount of the order and the shipping address) as well as basic information about payments and other data. The order tab consist of the following sections:
- Order & Account Information—with the information about an order and a customer.
- Address Information—with the information about the billing and shipping address of the customer.
- Payment & Shipping Method—with the basic information about a payment shipping method.
- Items Ordered—with the information about purchased products.
The Transactions item of the left menu contains the information about transactions within the order. Each transaction corresponds to an operation processed on the Ecommpay platform side. Thus, transactions of the following types can be created:
- Authorization—in case of an authorisation hold placed on funds (the
authoperation); - Capture—in case of a withdrawal of funds (the
captureoperation for a two-step purchase or thesaleoperation for a one-step purchase); - Void—in case of a release of funds within a two-step purchase (the
canceloperation); - Refund—in case of a refund (the
refundoperation).
The identifier if each transaction (Transaction ID) corresponds to the identifier of the request for processing the operation in the payment platform and is assigned to the subsequent transaction in the order as the identifier of the parent transaction (Parent Transaction ID).
More detailed information about working with orders in the Magento interface is provided in the Magento documentation.
Using Hyvä Themes
Overview
For web services based on the Magento CMS version 2.0, you can use a theme from Hyvä instead of the default Magento themes—Blank and Luma. Hyvä Themes combines the lightweight, fast-to-implement frontend with modern development tools (details) and is compatible with the plug-in from Ecommpay for the Magento CMS. To use it, you also need to install the following additional components:
- Hyvä Themes version 1.3 or later—to create the frontend theme for your web service
- Hyvä Checkout version 1.3 or later—to create the checkout page theme for your web service
- Ecommpay Hyvä—to integrate the payment form that is adapted for use with Hyvä Checkout
With the use of the Hyvä theme, you can flexibly configure your checkout page, offering either a one-page checkout where all steps (entering the customer's contact details, shipping and payment information) are displayed on a single screen or a multi-step checkout that separates them into individual pages. Each checkout configuration supports both options of opening Payment Page: directly in an iframe embedded in the page or with the payment form opened in a modal window or a separate browser tab.
Note that the Ecommpay payment form integrated to work with the Hyvä theme is also backward compatible with the Blank and Luma themes; hence, using these default themes with the Ecommpay Hyvä plug-in will not affect payment acceptance rates.
Setup and configuration
To start using the Hyvä products with the plug-in from Ecommpay for the Magento CMS version 2.0, you should set up the required Hyvä and Ecommpay plug-ins and activate the Hyvä theme in the Magento admin panel. There are two ways to install the plug-in—via the plug-ins directory of Magento (without prior download of the plug-in files) or using the zip files of the plug-in (with the plug-in files downloaded beforehand).
The setup and configuration process consists of the following steps:
- Install Hyvä Themes and Hyvä Checkout and make sure their modules are listed as dependencies in your Magento project.
To install, follow the official installation instructions for Hyvä Themes and Hyvä Checkout. To check, open the composer.json file located in the root folder with your Magento CMS files and find the following dependencies with the appropriate versions.
"hyva-themes/magento2-default-theme": "^1.3", "hyva-themes/magento2-hyva-checkout": "^1.3" - Install the Ecommpay Hyvä plug-in in addition to the plug-in from Ecommpay for the Magento CMS version 2.0 and make sure the Ecommpay modules are listed as dependencies in your Magento project.
To install the plug-in via the plug-in directory, run the following Composer commands from the root folder with your Magento CMS files.
composer config repositories.ecommpay/hyva-magento git https://github.com/ITECOMMPAY/hyva-magento.githttps://github.com/ITECOMMPAY/hyva-magento.git
composer require ecommpay/hyva-magento
To install the plug-in using the plug-in zip file, download the zip file from GitHub, unzip the folder with the plug-in files and add it to the folder with the source code of the web service built on the Magento CMS.
If the Ecommpay plug-in for the Magento CMS version 2.0 has not been installed yet, it will be installed automatically along with the Ecommpay Hyvä plug-in via the plug-in directory, or you can install it manually using the plug-in zip file (details).
Then, proceed to open the composer.json file located in the root folder with your Magento CMS files and confirm that
ecommpay/hyva-magentoandecommpay/module-paymentsare listed as dependencies. - Enable the installed plug-ins by running the following Composer commands.
bin/magento setup:upgrade bin/magento cache:flush bin/magento cache:clean bin/magento setup:di:compile bin/magento setup:static-content:deploy - Activate Hyvä Themes for your web service and configure settings of plug-ins in the Magento admin panel.
To do so, follow the official installation instructions for Hyvä Themes and Hyvä Checkout.
Note: Note that the data set mandatory for processing card payments includes parameters required for performing the AVS (Address Verification Service) check. To submit these data with Payment Page embedded directly into the web service interface (in an iframe element), use the fields for collecting the customer's postal code and shipping address on the checkout page. To do so, mark thepostcodefield and at least one field from thestreetgroup as required in the Hyvä Checkout plug-in settings. - Make sure that the Hyvä theme is applied to your web service and the Ecommpay Hyvä plug-in is enabled.
To do so, check that the theme is visible on the frontend of your web service and on the checkout page. It is also recommended that you make a test card purchase and, as you place an order, proceed as far as to the step of entering payment details to ensure that the Ecommpay payment form opens correctly.
If you encounter questions related to the Ecommpay Hyvä plug-in installation, contact the Ecommpay technical support.
Parameters for using payment methods
When working with the plug-in from Ecommpay, in the Magento interface, you can set up the usage of various payment methods available in the merchant's project. You can do this via separate accordion items on the page with the plug-in operation parameters by specifying the following parameters:—Card payments (with parameters for card payments) and Alternative payment settings (with parameters for using alternative methods). The latter contains another accordion item More payment methods via Ecommpay in which you can set up the usage of all methods available in the project—this can be relevant in case of working with methods for which no separate parameters are allocated in the plug-in operation parameters.
The accordion items for payment methods setup contain the following parameters:
- General parameters:
- Enabled—the feature for enabling a payment method to work via the plug-in.
To enable a method, set the value Yes, to disable a method, set the value No.
- Title—the payment method name displayed on the checkout page in the web service.
- Show Description—the feature for displaying the text from the Description parameter.
- Description—the text displayed to the customers when they select a certain payment method.
- Sort Order—the number that indicates the order in which the payment method available via the plug-in from Ecommpay is displayed on the checkout page in the web service.
For a payment method to be displayed first on the list of methods, specify the value
0or leave the field blank. Along with that, if a payment method is disabled in the web service, its place on the list of methods is taken by the payment method with the next number. If the0value is specified or the Sort Order field is left blank for several methods, the order in which these methods are displayed reflects the order of the accordion items with the parameters for using these methods.
- Enabled—the feature for enabling a payment method to work via the plug-in.
- Parameters used only in the Card payments accordion item:
- Display mode—the option for opening the Payment Page payment form.
One of the following options can be selected:
- Redirect—opening as a separate HTML page;
- Popup—opening in a modal window;
- Embedded—opening in an iframe elementNote: After installing the plug-in or updating its version, this option is set up by default.
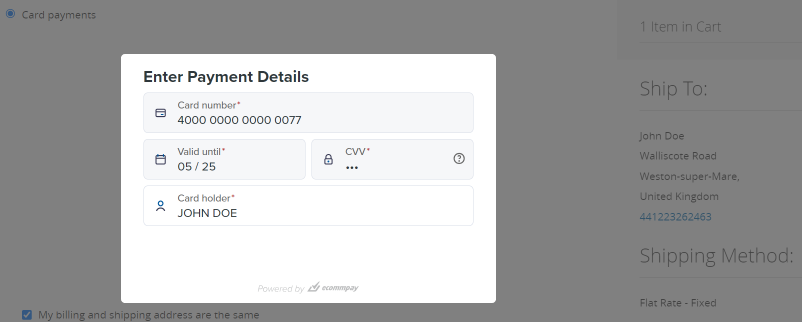
If the payment form is opened in an iframe element (the Embedded option), then, when the customer selects to make the purchase using a payment card, the Payment Page payment form is displayed in the section with payment options on the checkout page, is adapted to the standard checkout page design in the web service, and does not contain the button for confirming the purchase. In this payment form, the customer can select the payment card credentials (if they were saved earlier) or specify them and then confirm the purchase by using the checkout button on the web service page. When selecting other payment methods, the customer is redirected to subsequent pages.
Figure 12. Example of opening the Payment Page payment form on the checkout page 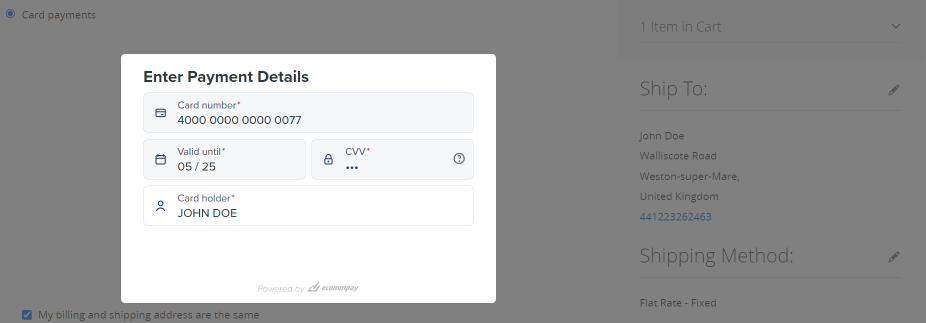
Figure 13. The accordion item Card payments with parameters for card payments 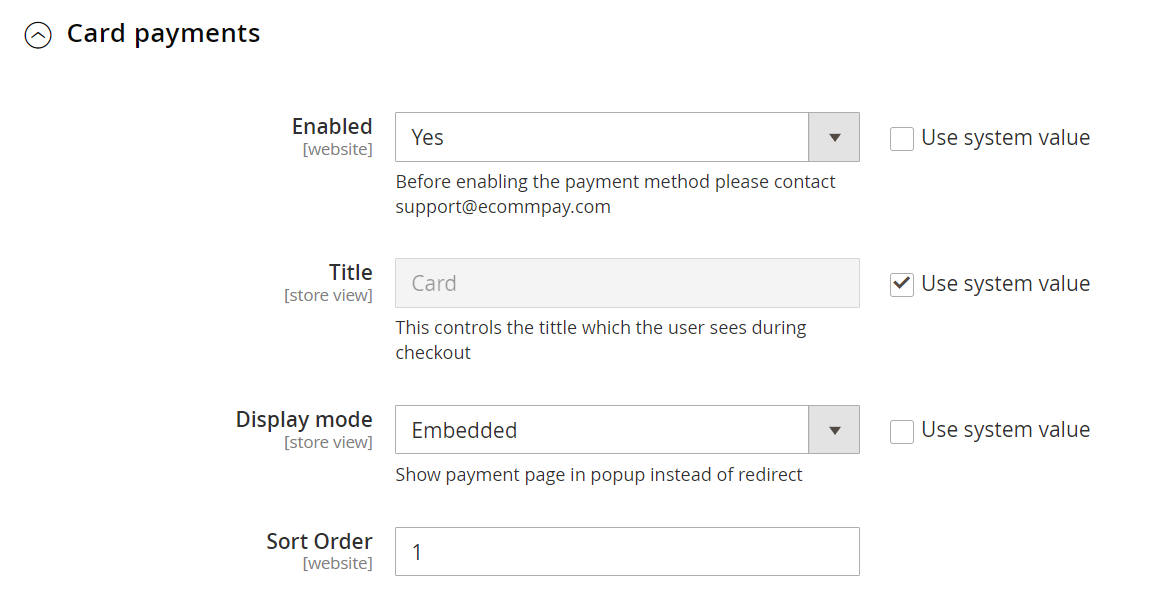
- Display mode—the option for opening the Payment Page payment form.
- The parameter used only in the More payment methods via Ecommpay accordion item:
- Payment method code—the code of a payment method used as the only additional one (in relation to the methods which are set up via separate accordion items).
- Without this parameter used, when the customer selects a purchase method in the web service interface, they can select the More payment methods option, proceed to the payment form, and select one of the methods available for the payment being initiated in the Ecommpay platform. Along with that, all methods from Ecommpay that can be selected directly in the web service (together with the More payment methods option) become available in the payment form.
- With this parameter containing the code of one of the available methods (taken from the reference), when the customer selects a purchase method in the web service interface, among other available methods, they can select the one specified via the code and proceed to paying via this method without selecting any other methods in the payment form. To prevent issues that may be triggered by such a selection, alongside the payment method code, the name of the method should also be specified in this section (in the Title field).
Note: Since in the plug-in test mode, it is possible to process only card purchases, the work of the More payment methods via Ecommpay accordion item in this mode can be tested only for thecardmethod.
Figure 14. The accordion item More payment methods via Ecommpay with parameters for using all payment methods 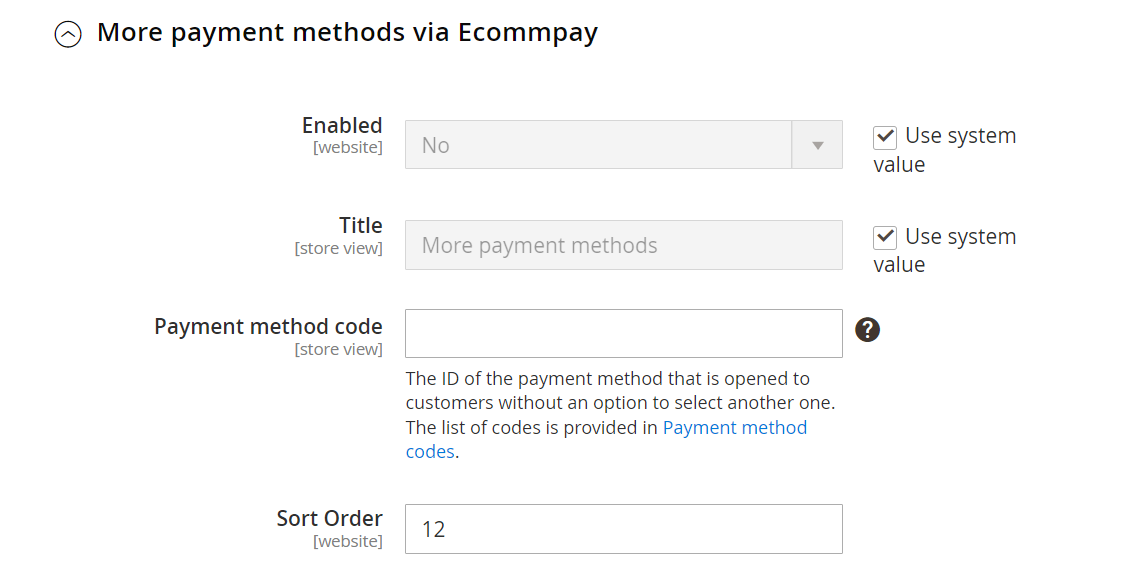
- Payment method code—the code of a payment method used as the only additional one (in relation to the methods which are set up via separate accordion items).