Using ecommpay Salesforce Commerce Cloud Cartridge plug-in
Overview
This article covers the information about using the payment plug-in ecommpay Salesforce Commerce Cloud Cartridge in the Commerce Cloud platform. The plug-in version 2.0 can be used in the web services developed on the basis of the Storefront Reference Architecture (SFRA) version 6.0 or later with the use of the B2C Commerce solution version 23.8 or later and allows opening the Payment Page payment form of ecommpay for customers and ensuring all necessary actions for payment processing.
The ecommpay Salesforce Commerce Cloud Cartridge plug-in is installed via the Business Manager interface and allows opening the Payment Page payment form of ecommpay for customers. The plug-in also allows you to ensure all necessary actions for payment processing with regard to the interaction with both customers and the ecommpay payment platform (with all necessary information sent and received).
The ecommpay Salesforce Commerce Cloud Cartridge can be downloaded from the AppExchange marketplace offering the Salesforce solutions.
General information
Capabilities
With the ecommpay Salesforce Commerce Cloud Cartridge plug-in, the following is available:
- Setting up the capability to open the Payment Page payment form of ecommpay in the web service.
For this, you only need to install the plug-in and set up its usage in the Business Manager interface.
- Setting up the usage of separate payment methods available via the plug-in: card payments, the Apple Pay and Google Pay methods, and the methods of the Open Banking group (if they are available for the project in use).
You can do this directly via the payment methods register in the Business Manager interface. Technically, for using different payment methods, you may need to either configure a minimum of the plug-in parameters or take no actions at all, while all organisational issues can be resolved in cooperation with the ecommpay account manager.
- Testing the operation of the payment form and the capabilities of payment processing.
For this, you should get a test project in the ecommpay payment platform (by submitting an application on the company's main site).
- Processing one-time one-step and two-step purchases.
For this, you use the methods that support the corresponding payment type. Along with that, two-step purchases can be processed only with the use of methods that support this payment type, and the funds being withdrawn can be not only the entire authorised amount but also a part of this amount.
- Issuing partial and full refunds for purchases, which were processed with the help of the plug-in, via the Dashboard and Gate interfaces of ecommpay.
For this, you can use the Business Manager interface and, if relevant,—the ecommpay payment platform interfaces ( the user interface Dashboard and the Gate API). Along with that, when using the interfaces of the ecommpay payment platform, payment information in the Business Manager interface is updated only if conditions for sending callbacks from the payment platform have been configured (details).
- Monitoring the information about payments processed with the help of the plug-in.
For this, you can use the Business Manager interface and if relevant—the Dashboard interface from ecommpay.
- Managing orders with related purchases processed with the help of the plug-in—via the Business Manager interface.
This includes cancelling these orders and changing their statuses manually.
- Configuring the parameters of the Payment Page operation and adjusting the form to the web service specifics, as well as using various capabilities provided by ecommpay.
Particularly, you can use the payment confirmation procedure when working with Open Banking methods, provide customers with the capability of payment retries (details), and set up sending notifications to customers about the purchased goods and services (details). To have these capabilities set up, contact the ecommpay technical support specialists.
Such a wide range of capabilities allows you to adjust to various business specifics, flexibly configure user scenarios, and ensure high rates of payment form conversion and payment acceptance. For setting up and using the capabilities provided by ecommpay, refer to the technical documentation on this portal and, if necessary, contact the ecommpay specialists.
Workflows
The following diagrams illustrate the workflows of executing one-time one-step and two-step purchases with the use of the ecommpay Salesforce Commerce Cloud Cartridge plug-in. The workflows involve the customer, the merchant's web service with the built-in plug-in, the Payment Page payment form, the payment platform, and the payment environment. On the web service side, the opening of Payment Page is requested and automatic interaction with the payment platform is carried out in accordance with the plug-in parameters.
In case of one-step purchases, one initial request leads to a one-time transfer of funds from the customer to the merchant which is followed by a callback with the information about the payment result sent to the web service.
- On the web service side, the customer opens the checkout page and selects a payment method available via the ecommpay Salesforce Commerce Cloud Cartridge plug-in.
- The request for opening the Payment Page payment form is automatically generated and sent to the payment platform via the plug-in, for processing the payment with use of the select payment method.
- The request for opening Payment Page is received in the payment platform.
- The request is processed in the payment platform and checked for correctness.
- The necessary actions are performed on the payment platform side to prepare for displaying the payment form to the customer.
- The payment form is displayed to the customer.
- The customer completes the required actions and confirms the purchase.
- The final purchase request (with all necessary data) is received in the platform.
- The request is sent to the payment environment.
- The request is processed in the payment environment. And if necessary, additional actions are performed on the side of the platform and the customer (for example, the 3‑D Secure authentication).
- The purchase result information is sent from the payment environment to the payment platform.
- The callback with the purchase result information is sent from the payment platform to the web service. The callback is automatically processed with the help of the plug-in, thus the payment and order information is updated in the Business Manager interface.
- The purchase result information is sent from the payment platform to Payment Page.
- The purchase result information is displayed to the customer in the merchant's web service on the page with the information about the paid order.
In case of two-step purchases, based on an initial request (at the first step), the funds are held on the customer's account and then (at the second step), based on the next request or automatically after a specified time period, the funds are transferred to the merchant or released. Along with that, at each step, a callback with the information about the corresponding result is sent to the web service.
- On the web service side, the customer opens the checkout page and selects a payment method available via the ecommpay Salesforce Commerce Cloud Cartridge plug-in.
- The request for opening the Payment Page payment form is automatically generated and sent to the payment platform via the plug-in, for processing the payment with use of the select payment method.
- The request for opening Payment Page is received in the payment platform.
- The request is processed in the payment platform and checked for correctness.
- The necessary actions are performed on the payment platform side to prepare for displaying the payment form to the customer.
- The payment form is displayed to the customer.
- The customer completes the required actions and confirms the purchase.
- The request for authorisation hold is received in the platform.
- The request is sent to the payment environment.
- The payment is processed and the funds are authorised in the payment environment. And if necessary, additional actions are performed on the side of the platform and the customer (for example, the 3‑D Secure authentication).
- The information about the authorisation hold result is sent from the payment environment to the payment platform.
- The callback with the information about the authorisation hold result is sent from the payment platform to the web service. The callback is automatically processed with the help of the plug-in, thus the payment information is updated in the Business Manager interface.
- The information about the authorisation hold result is sent from the payment platform to Payment Page.
- The information about the authorisation hold result is displayed to the customer in the merchant's web service on the page with the information about the paid order.
- After it has been confirmed that the funds should be withdrawn, the merchant's specialist initiates the withdrawal via the Business Manager interface, and as result, a request for withdrawing the funds is received and processed in the payment platform (which is done with the help of the plug-in).
- The request is sent to the payment environment.
- The payment is processed in the payment environment.
- The information about the withdrawal result is sent from the payment environment to the payment platform.
- The callback with the information about the withdrawal result is sent from the payment platform to the web service. The callback is automatically processed with the help of the plug-in, thus the payment and order information is updated in the Business Manager interface.
- The customer is notified about the withdrawal result by the means of the web service.
There are two options for working within the provided general workflows:
- with the payment form embedded directly into the web service interface (in an iframe element);
- with the payment form opened in a separate tab.
The first of these options is available only for purchases with the direct use of payment cards and is used for such purchases by default. In case of the firstthis option, the customer specifies payment card credentials and confirms the order, which is generated in the Commerce Cloud platform, and the payment, which is generated in the ecommpay platform, directly on the web service page for proceeding to payment (using the Place Order button).
The second of these options is used for all alternative payment methods and for purchases with the direct use of payment cards if these purchases are made with the payment form opened in a separate tab. In case of the secondthis option, the customer first confirms the order which is generated in the Commerce Cloud platform on the web service page for proceeding to payment (using the Place Order button) and only after that specifies the necessary data in the payment form and confirms the payment which is generated in the ecommpay platform (using the Pay button).
Additionally, the second option can lead to cases when the customer confirms the order but does not proceed to payment. In such cases, orders in the Created status appear in the web service with no purchases initiated for these orders. As to the rest, the work with orders and the corresponding payments is the same for both options.
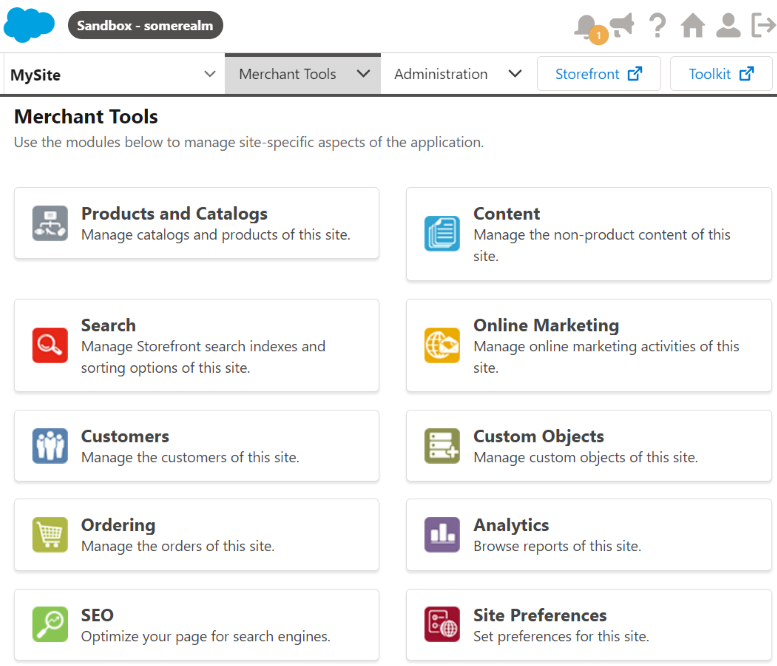
You can monitor the information about orders and payments via the Business Manager interface in the Ordering section of the Merchant Tools tab. Along with that, these orders and payments Orders and payments have different identifiers and statuses. Orders on the web service side are assigned eight-digit numbers (for example, 00001405) and statuses used in B2C Commerce (details), while payments on the payment platform side are assigned identifiers that consist of the prefix sfcc_ and a code of 43 random characters (for example, sfcc_jsiEZCfbMDW7n3EQp8NyDqJ8B0YubPsp13QYCmPJvia) and statuses used by ecommpay (details). With questions about the statuses of payments and orders, contact the ecommpay account manager.
User scenarios
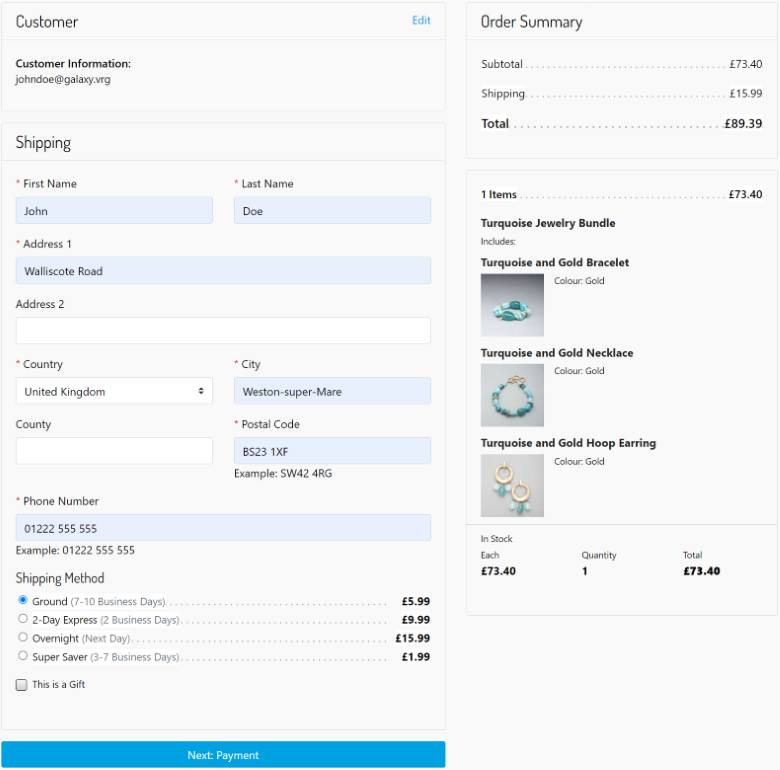
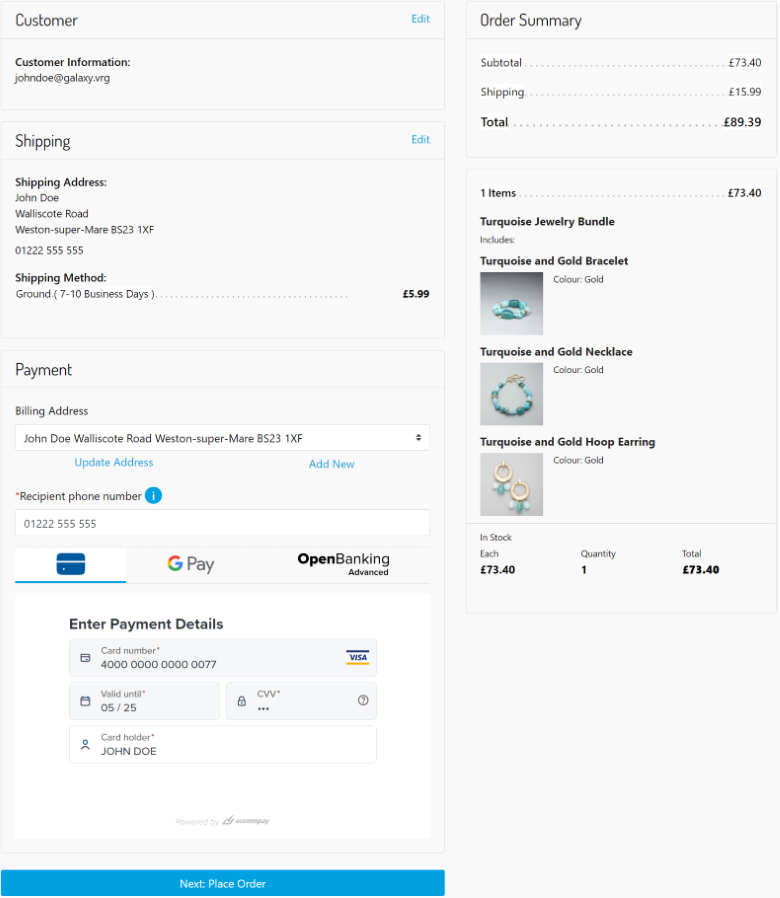
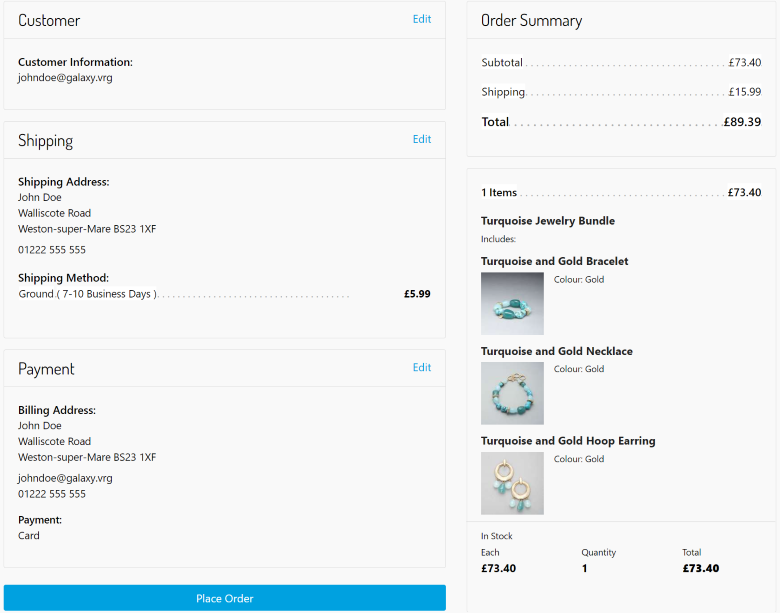
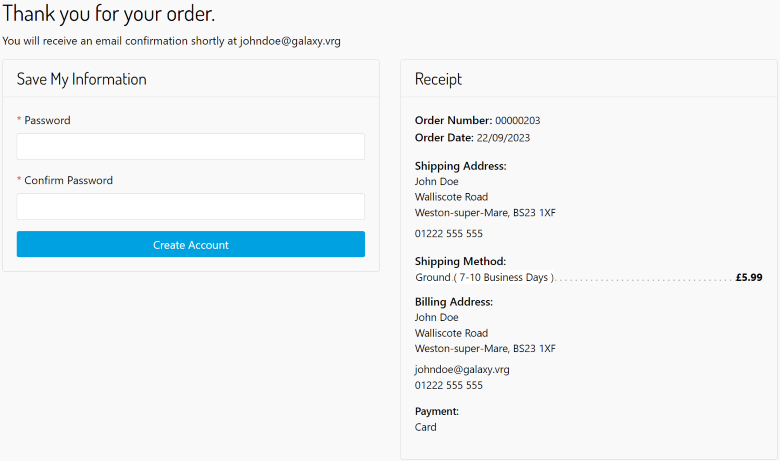
The user scenarios of making a purchase and generating an order via the ecommpay Salesforce Commerce Cloud Cartridge plug-in depend on the option of the Payment Page opening. Thus, in In the general case, when the form is embedded directly in the web service interface (for card payments only), the scenario of making a purchase and generating an order via the ecommpay Salesforce Commerce Cloud Cartridge looks as follows:
- On the web service side, the customer opens the checkout page, specifies the needed data for the order generation and proceeds to selecting a purchase option (using the Next: Payment button).
- The customer selects the option to pay with the card, specifies the card credentials in the Payment Page form, and proceeds to confirming the order (using the Next: Place Order button).
- The customer confirms the order (using the Place Order button).
- The customer receives the purchase information.
Installation
To start using the ecommpay Salesforce Commerce Cloud Cartridge plug-in version 2.0, you should initially download the zip file of the Storefront Reference Architecture (SFRA) of Salesforce (from the repository of Salesforce) and the zip file of the plug-in (from the repository of ecommpay or from the AppExchange marketplace) and unzip them. The SFRA files can be downloaded from the repository of Salesforce, and the plug-in files can be downloaded from the repository of ecommpay on GitHub or from the AppExchange marketplace. The information about accessing the Salesforce repository is provided in the Salesforce documentation.
To install the plug-in, proceed as follows:
- If the Node.js platform has not been installed (or if the installed version is earlier than Node.js 16), install (update) it and execute the
npm install --global yarncommand in the operating system command line. - Consecutively execute the commands
yarn installandyarn buildfrom the folder with the SFRA files. - Copy all the files for enabling foundational functions of the SFRA from the
SFRA/cartridgessubfolder to theecommpay_integration/cartridgessubfolder. - Consecutively execute the commands
yarn installandyarn buildfrom the folderecommpay_integration. - Create a
dw.jsonfile in theecommpay_integrationfolder.This file must contain the data for accessing a virtual environment that is used for developing the web service (a sandbox instance). Along with that, the file must contain the web service source code for which you need to install the plug-in. (The versions used during the work with the Commerce Cloud platform can be found on the Administration tab, in the Code Deployment subsection of the Site Development section.)Information about this file and the work with it is provided in the Salesforce documentation.
More detailed information about the
dw.jsonfile and the work with it is provided in the Salesforce documentation. - Execute the
yarn uploadCartridgecommand from theecommpay_integrationfolder. - Activate the code version specified in the
dw.jsonfile via the Business Manager interface.You can do that on the Administration tab, in the Code Development subsection of the Site Development section.
For this, proceed as follows:
- Go to the Administration tab and then to the Code Development subsection of the Site Development section.
- Click the Activate link in the line with the needed version.
- Enable the Salesforce Commerce Cloud Cartridge plug-in to work in the web service.
For this, specify the names of the plug-in files (
int_ecommpay_sfra:int_ecommpay_core) in the Cartridges parameter of the web service operation parameters in the Business Manager interface.The names of the ecommpay Salesforce Commerce Cloud Cartridge plug-in files may be followed by those of any other files with additional functions. Note that the name of the file with the SFRA foundational functions
app_storefront_basemust be the last specified in the parameter.For this, proceed as follows in the Business Manager interface:
- Go to the Administration tab and then to the Manage Sites subsection of the Sites section.
- Go to the web service operation parameters by clicking the web service name in the Storefront Sites register and go to the Settings tab.
- Specify the names of the plug-in files in the Cartridges parameter using colons as separators—
int_ecommpay_sfra:int_ecommpay_core—and click the Apply button.The names of the ecommpay Salesforce Commerce Cloud Cartridge plug-in files may be followed by those of any other files with additional functions, which can be relevant depending on the web service specifics (it can be, for example, the customisation of the web service pages). Note that the name of the file with the SFRA foundational functions
app_storefront_basemust be the last specified in the parameter.
Figure 9. Web service operation parameters in the Business Manager interface 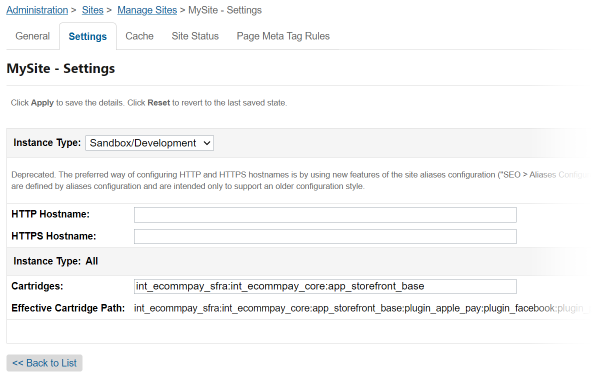
- Enable the Salesforce Commerce Cloud Cartridge plug-in to work in the Business Manager interface.
For this, specify the names of the plug-in files (
bm_ecommpay:int_ecommpay_core) in the Cartridges parameter as part of the parameters of the Business Manager interface operation.The names of the ecommpay Salesforce Commerce Cloud Cartridge plug-in files may be followed by those of any other files with additional functions. Note that the name of the file with the SFRA foundational functions
bm_app_storefront_basemust be the last specified in the parameter.For this, proceed as follows in the Business Manager interface:
- Go to the Administration tab and then to the Manage Sites subsection of the Sites section and click the Business Manager link in the Business Manager Site section.
- Specify the names of the plug-in files in the Cartridges parameter using colons as separators—
bm_ecommpay:int_ecommpay_core—and click the Apply button.The names of the ecommpay Salesforce Commerce Cloud Cartridge plug-in files may be followed by those of any other files with additional functions. Note that the name of the file with the SFRA foundational functions
bm_app_storefront_basemust be the last specified in the parameter.
Figure 10. Parameters of the Business Manager interface operation 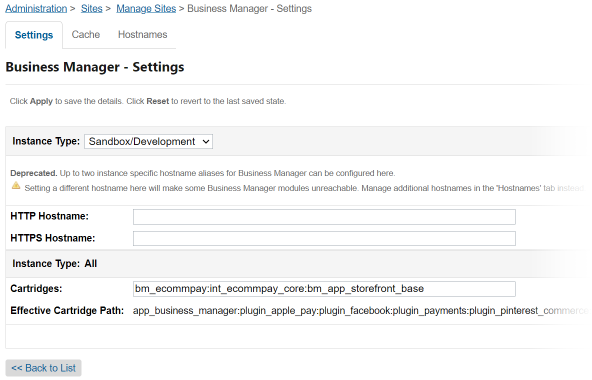
- Add the plug-in metadata in the web service.
For this, proceed as follows:
- Change the name of the folder
RefArchGlobalto the identifier of the web service in theecp_meta/sitessubfolder.The identifier of the web service is displayed in the Business Manager interface, in the Manage Sites subsection of the Sites section.
- Execute the
yarn zipMetadatacommand from theecommpay_integrationfolder for creating a zip file with metadata. - Go to the Administration tab and then to the Site Import & Export subsection of the Site Development section and click the Import button in the Meta Data section.
- Upload the zip file with the metadata of the plug-in using the upload function, select the line with the name of the uploaded file, and click the Import button.
- Change the name of the folder
- If necessary, enable the capability to initiate refunds after purchases, withdrawals or release of funds authorised as part of two-step purchases via the orders tabs.
This capability can be enabled for separate roles used in the Business Manager interface. To provide access to the mentioned functions within a particular role, proceed as follows:
- Go to the Administration tab and the to the Roles & Permissions subsection of the Organization section.
- Go to the parameters of the needed role by clicking the identifier of the role in the corresponding line of the register.
- Go to the Business Manager Modules tab, select a checkbox with the name of the web service being set up (in the Sites group), and click the Apply button.
- Go to the ecommpay section in the register of the modules available for setting the access permissions, select the checkbox in the ecommpay Order Action line, and click the Update button.
Testing
Overview
Testing the plug-in operation and various payment scenarios without actual debiting of funds is possible via the test environment of the ecommpay payment platform. You can connect to the platform by using the corresponding form on the company's main site and the identifier and key of the test project received from ecommpay. Along with that, it is necessary to provide the ecommpay technical support specialists with the name of the web service, for which the ecommpay Salesforce Commerce Cloud Cartridge plug-in should be used, the web service URL, and the payment currency.
Testing the plug-in operation and various payment scenarios is possible via the test environment of the ecommpay payment platform. For this, you need to use the identifier and the key of the test project received from ecommpay and provide the ecommpay technical support specialists with the required information.
On the Salesforce side, the work with the web services is carried out in virtual environments of special types (instances; details) which are used for developing web services (sanbox), for their configuration and testing (staging, development), for launching and maintaining web services (production). You can test the ecommpay Salesforce Commerce Cloud Cartridge plug-in in any of such environments, after specifying the identifier and the key of the test project of ecommpay in the plug-in operation parameters. It should be considered that, in cases when the plug-in is connected to a web service in live mode, the plug-in becomes available for payments to customers. Thus, it is recommended to ensure that testing takes place during a low-load period and notify the customers about the ongoing testing activities.
It should be considered that, in cases when the plug-in is connected to a web service in live mode, the plug-in becomes available for payments to customers. Thus, it is recommended to ensure that testing takes place during a low-load period and notify the customers about the ongoing testing activities.
Parameters setup
To prepare the ecommpay Salesforce Commerce Cloud Cartridge plug-in for testing, proceed as follows:
- Go to the plug-in operation parameters in the Business Manager interface.
For this, proceed as follows:
- Go to the Site Preferences section on the Merchant Tools tab.
- Go to the Custom Preferences subsection and click the ecommpay Config link in the register.
- Enable the plug-in in the web service in the Is ecommpay Enabled parameter.
For this set the Is ecommpay Enabled parameter to Yes.
- Specify the parameters for connecting to the payment platform test environment.
- Project ID—test project identifier
- Secret Key—the test project key for interacting with the platform
- If needed, specify the following parameters:
- ecommpay Card Display Mode—option for displaying the Payment Page payment form.
One of the following options can be selected:
- Redirect—opening as a separate HTML page
- Embedded—opening in an iframe elementNote: Upon the plug-in installation or update, this option is set by default.
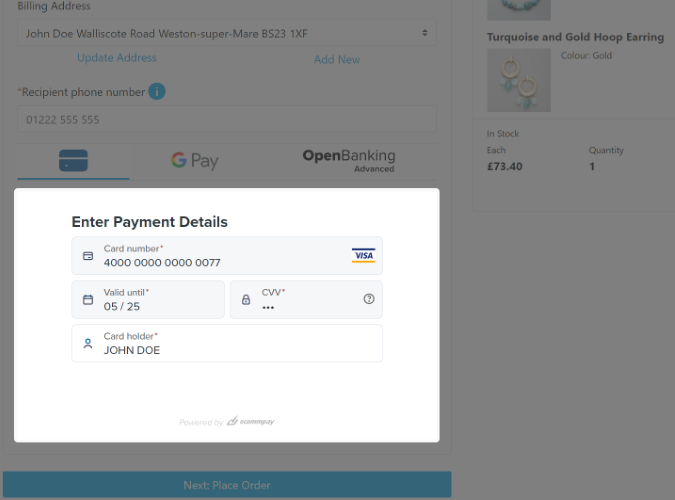
If the payment form is opened in an iframe element (the Embedded option), then when the customer selects the option to make a purchase using a payment card, the Payment Page payment form is displayed in the section with payment options on the checkout page, is adapted to the standard checkout page design in the web service, and does not contain the button for confirming the purchase. In this payment form, the customer can select the payment card credentials (if they were saved earlier) or specify them and then confirm the purchase by using the button for proceeding to payment on the web service page. When selecting other payment methods, the customer is redirected to subsequent pages.
Figure 11. Example of opening the Payment Page payment form on the checkout page 
- ecommpay Purchase Type—the type of purchases to be processed via the payment platform.
One of the following options can be selected:
- Sale – One-step purchase (ecommpay_SALE)—for one-step purchases
- Auth – Two-step purchase (ecommpay_AUTH)—for two-step purchases
Note: If the option for two-step purchases is selected, the customers can make payments only with the direct use of payment cards and the Apple Pay and Google Pay services. Two-step purchases are not supported for the Open Banking methods, thus the option for these methods is not available on the checkout page.
Figure 12. Plug-in operation parameters in the Business Manager interface 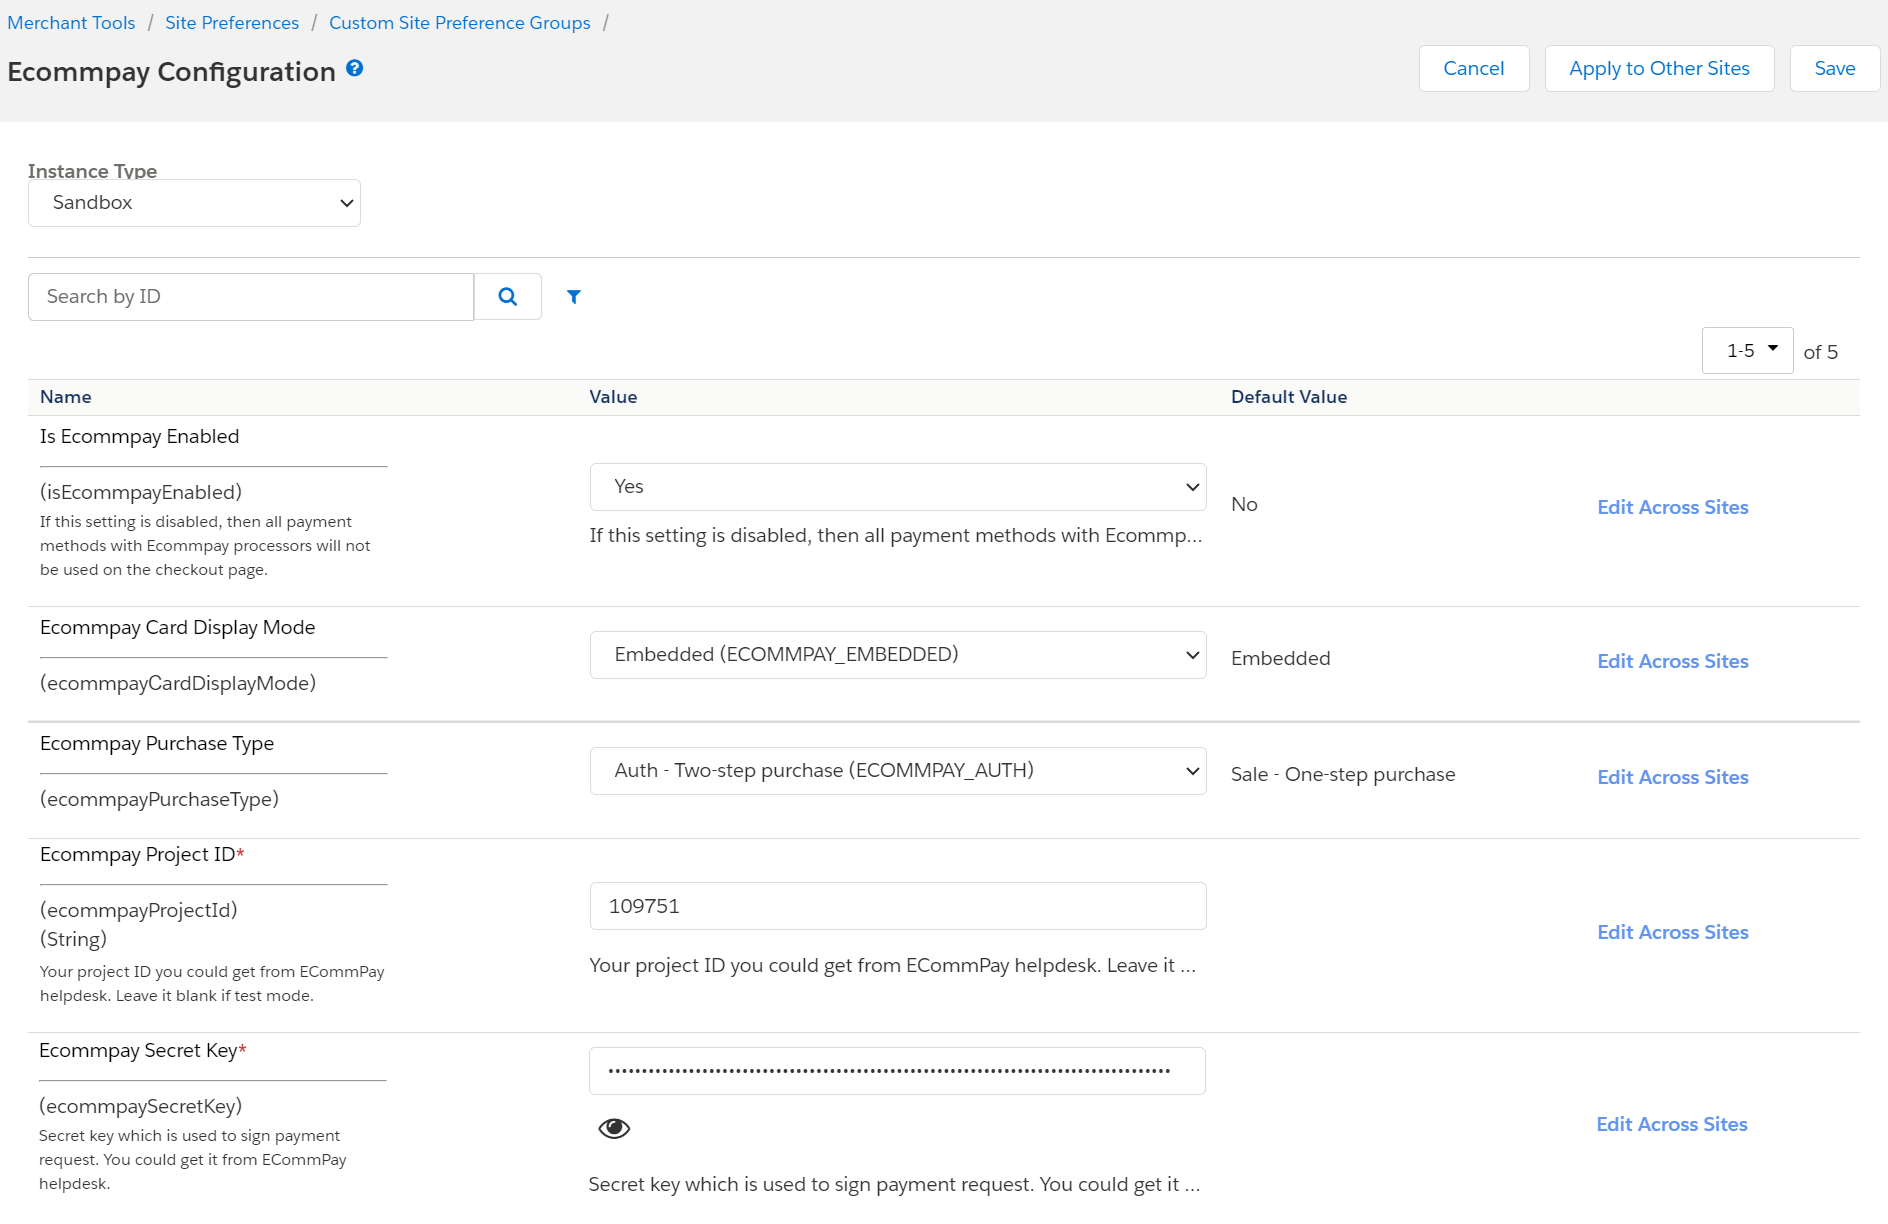
- ecommpay Card Display Mode—option for displaying the Payment Page payment form.
- Save the plug-in operation parameters.
For this, click the Save button.
- Set up the parameters for using payment methods (in the Payment Methods subsection of the Ordering section on the Merchant Tools tab).
Processing test purchases
When testing the plug-in operation, you can process test purchases in the web service and obtain information about them via the Business Manager interface—in the Orders subsection of the Ordering section on the Merchant Tools tab. Along with that, you can use special payment credentials that allow testing particular payment scenarios.
To test card payments, you can use the credentials of test cards. For testing according to the shortest scenarios (without the emulation of the 3‑D Secure authentication), the following numbers of cards can be used:
4000 0000 0000 0077—for a purchase to be processed4111 1111 1111 1111—for a purchase to be declined
For more comprehensive testing, it is possible to use extended test data for card payments (details). (including scenarios with the 3‑D Secure authentication) provided in the Test cards article.
To test payments using alternative payment methods (with these methods set up through an account manager or the technical support specialists in the test environment of payment platform), you can use the information provided in the Testing article and in the corresponding sections of the articles about working with particular payment methods.
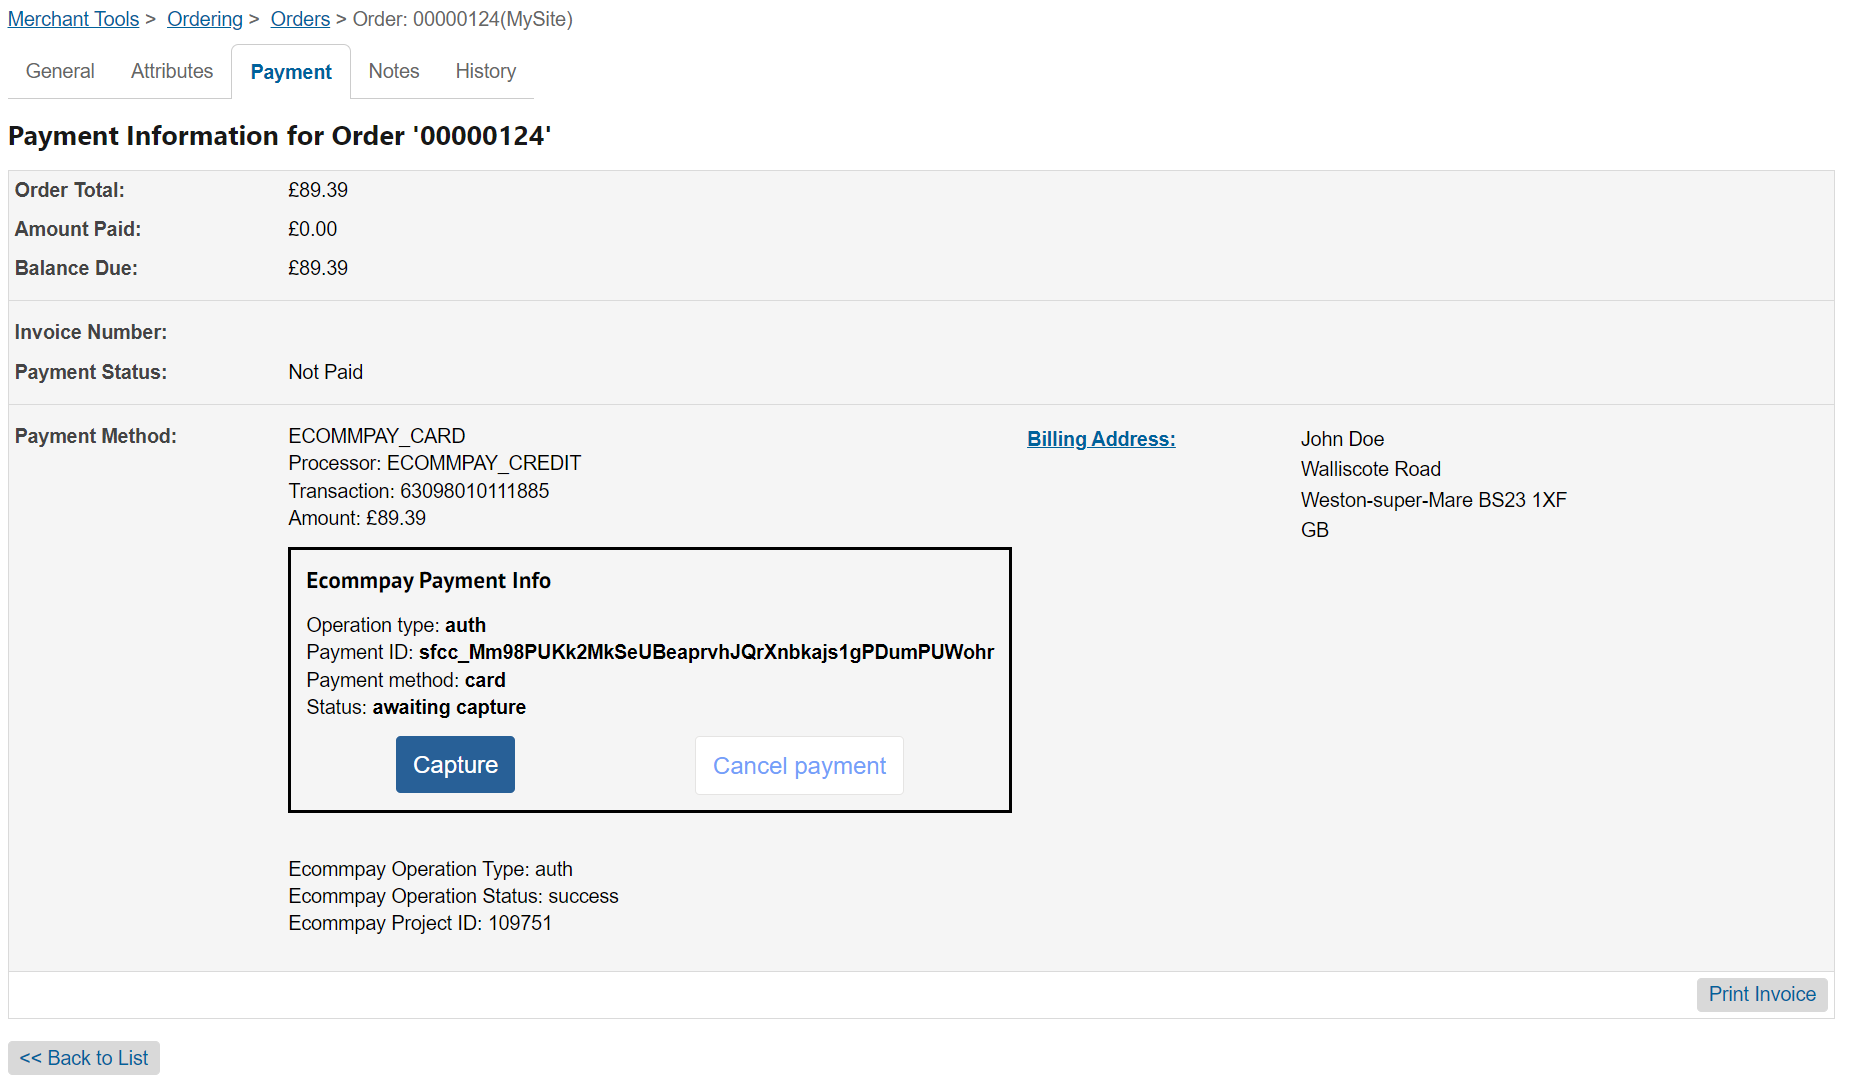
During the processing of two-step purchases, the first step, the authorisation hold, is initiated by the customer when they confirm the purchase, while the second step, the withdrawal of the authorised amount or the release of funds, can be initiated automatically, after the time allocated for the funds to remain authorised expires, or manually via the Business Manager interface: with the use of the Capture (for the withdrawal of funds) and Cancel payment (for the release of funds) buttons. Along with that, it is possible to withdraw not only the entire authorised amount but also a part of this amount.
To have the automatic initiation of the second step set up, contact the ecommpay technical support specialists.
The second step of a two-step purchase can be initiated in one of the following ways:
- via the Business Manager interface with the use of the button Capture for withdrawing the funds or Cancel payment for releasing the funds,
- via the Dashboard interface with the use of the button Capture for withdrawing the funds or Cancel for releasing the funds (details),
- via the Gate API with the use of the request
capturefor withdrawing the funds orcancelfor releasing the funds (details).
For payment and order information to be automatically updated in the Business Manager interface when initiating the second step of a two-step purchase, ensure that, for the project in use, the settings of callbacks to be sent from the payment platform to the web service URL have been configured. The callbacks should be sent to the web service URL specified in the following format https://<site subdomain>.<site domain>/on/demandware.store/Sites-Mysite-Site/en_GB/Gate-Receive. Along with that, it is important that, for a single payment type, there are no several sets of conditions with the same values of event types and payment method codes set up. Otherwise, the plug-in logs display error messages related to processing of callbacks received from the payment platform. The information about working with callback settings is provided in the corresponding article of the documentation.
Processing test refunds
After processing test purchases, you can make test refunds via the Business Manager interface and, if relevant, via the Gate API and Dashboard interfaces in the ecommpay platform. Information provided in this subsection is also relevant for issuing refunds in the life mode.
Along with that, for payment and order information to be automatically updated in the Business Manager interface when processing refunds, ensure that, for the project in use, the settings of callbacks to be sent from the payment platform to the web service URL have been configured. The callbacks should be sent to the web service URL specified in the following format https://<site subdomain>.<site domain>/on/demandware.store/Sites-Mysite-Site/en_GB/Gate-Receive. Along with that, it is important that, for a single payment type, there are no several sets of conditions with the same values of event types and payment method codes set up. Otherwise, the plug-in logs display error messages related to processing of callbacks received from the payment platform. The information about working with callback settings is provided in the corresponding article of the documentation.
Keep in mind that refunds can be made in case if payments in the ecommpay payment platform have the statuses success, partially reversed, or partially refunded. Information about refunds can be monitored via the payment platform interfaces and via order tabs of the Business Manager interface.
To perform a refund via the Business Manager interface, proceed as follows:
- Open the orders register.
For this, you should open the Merchant Tools tab and then open the Orders subsection of the Ordering section.
- Open the tab of the order that should be refunded.
- Initiate the refund (via the Payment tab).
For this, you should open the Payment tab, click the Refund button in the Payment Method section, specify the refund amount, and click the Submit button in the window that opens.
- Ensure that the refund has been made.
For this, you can check that the operation information has been updated on the Payment tab and a record about the performed refund is displayed on the Notes tab (in case of a full refund).
In case of a partial refund, the order status remains unchanged (unless it is done manually), while the payment on the platform side is assigned the status
partially refunded. In case of a full refund, the order is assigned the statusCancelled, while the payment on the platform side is assigned the statusrefunded.
Usage
Overview
In order to process payments with actual debiting of funds, you should initially solve all organisational issues related to the interaction with ecommpay (submit the application for connecting to the payment platform, provide all necessary information, and receive a notification from ecommpay about the possibility to process payments, as well as the identifier and secret key of the production project). Along with that, it is necessary to provide the ecommpay technical support specialists with the name and URL of the web service for which the ecommpay Salesforce Commerce Cloud Cartridge plug-in should be used and the currency in which payments are to be processed.
After that, you can switch the plug-in to the production mode, specify the received identifier and secret key of the production project received from ecommpay in the parameters of the plug-in operation and set up other necessary parameters. (or check whether the current setup is relevant for working in real-life conditions). If, after the setup, you need to suspend the plug-in operation, for example, to test additional features, the plug-in can be disabled in the web service that operates in live mode and you can continue working with it in virtual environments from Salesforce (instances) intended for development and testing.
Parameters setup
To set up the plug-in parameters, proceed as follows:
- Go to the plug-in parameters in the Business Manager.
For this, proceed as follows:
- Go to the Site Preferences section on the Merchant Tools tab.
- Go to the Custom Preferences subsection and click the ecommpay Config link in the register.
- Enable the plug-in in the web service in the Is ecommpay Enabled parameter.
For this set the Is ecommpay Enabled parameter to Yes.
- Specify the parameters for connecting to the payment platform production environment.
- Project ID—the project identifier
- Secret Key—the project key for interacting with the platform
- If needed, specify the following parameters:
- ecommpay Card Display Mode—option for displaying the Payment Page payment form.
One of the following options can be selected:
- Redirect—opening as a separate HTML page
- Embedded—opening in an iframe elementNote: Upon the plug-in installation or update, this option is set by default.
If the payment form is opened in an iframe element (the Embedded option), then when the customer selects the option to make a purchase using a payment card, the Payment Page payment form is displayed in the section with payment options on the checkout page, is adapted to the standard checkout page design in the web service, and does not contain the button for confirming the purchase. In this payment form, the customer can select the payment card credentials (if they were saved earlier) or specify them and then confirm the purchase by using the button for proceeding to payment on the web service page. When selecting other payment methods, the customer is redirected to subsequent pages.
Figure 14. Example of opening the Payment Page payment form on the checkout page 
- ecommpay Purchase Type—the type of purchases to be processed via the payment platform.
One of the following options can be selected:
- Sale – One-step purchase (ecommpay_SALE)—for one-step purchases
- Auth – Two-step purchase (ecommpay_AUTH)—for two-step purchases
Note: If the option for two-step purchases is selected, the customers can make payments only with the direct use of payment cards and the Apple Pay and Google Pay services. Two-step purchases are not supported for the Open Banking methods, thus the option for these methods is not available on the checkout page.
Figure 15. Plug-in operation parameters in the Business Manager interface 
- ecommpay Card Display Mode—option for displaying the Payment Page payment form.
- Save the plug-in operation parameters.
For this, click the Save button.
- Set up the parameters for using payment methods (in the Payment Methods subsection of the Ordering section on the Merchant Tools tab).
Issuing refunds
After processing test purchases, you can make test refunds via the Business Manager interface and, if relevant, via Gate and Dashboard in the ecommpay platform. All capabilities and procedures of working with refunds in the life mode correspond to those available in the testing environments.
Along with that, for payment and order information to be automatically updated in the Business Manager interface when processing refunds, ensure that, for the project in use, the settings of callbacks to be sent from the payment platform to the web service URL have been configured. The callbacks should be sent to the web service URL specified in the following format https://<site subdomain>.<site domain>/on/demandware.store/Sites-Mysite-Site/en_GB/Gate-Receive. Along with that, it is important that, for a single payment type, there are no several sets of conditions with the same values of event types and payment method codes set up. Otherwise, the plug-in logs display error messages related to processing of callbacks received from the payment platform. The information about working with callback settings is provided in the corresponding article of the documentation.
Keep in mind that refunds can be made in case if payments in the ecommpay payment platform have the statuses success, partially reversed, or partially refunded. Information about refunds can be monitored via the payment platform interfaces and via order tabs of the Business Manager interface.
To perform a refund via the Business Manager interface, proceed as follows:
- Open the orders register.
For this, you should open the Merchant Tools tab and then open the Orders subsection of the Ordering section.
- Open the tab of the order that should be refunded.
- Initiate the refund (via the Payment tab).
For this, you should open the Payment tab, click the Refund button in the Payment Method section, specify the refund amount, and click the Submit button in the window that opens.
- Ensure that the refund has been made.
For this, you can check that the operation information has been updated on the Payment tab and a record about the performed refund is displayed on the Notes tab (in case of a full refund).
In case of a partial refund, the order status remains unchanged (unless it is done manually), while the payment on the platform side is assigned the status
partially refunded. In case of a full refund, the order is assigned the statusCancelled, while the payment on the platform side is assigned the statusrefunded.
Monitoring payments and orders
Information about payments processed with the use of the ecommpay Salesforce Commerce Cloud Cartridge plug-in and about the corresponding orders can be monitored in the Business Manager interface, via the tools of the Orders subsection in the Ordering section.
Along with that, you can use the Dashboard interface from ecommpay (details) to obtain the information about payments and refunds made via the ecommpay platform (although the information about orders is not displayed in there).
The Orders subsection contains the orders register with main details about every order including the capabilities to search and filter data and to open the tabs of separate orders.
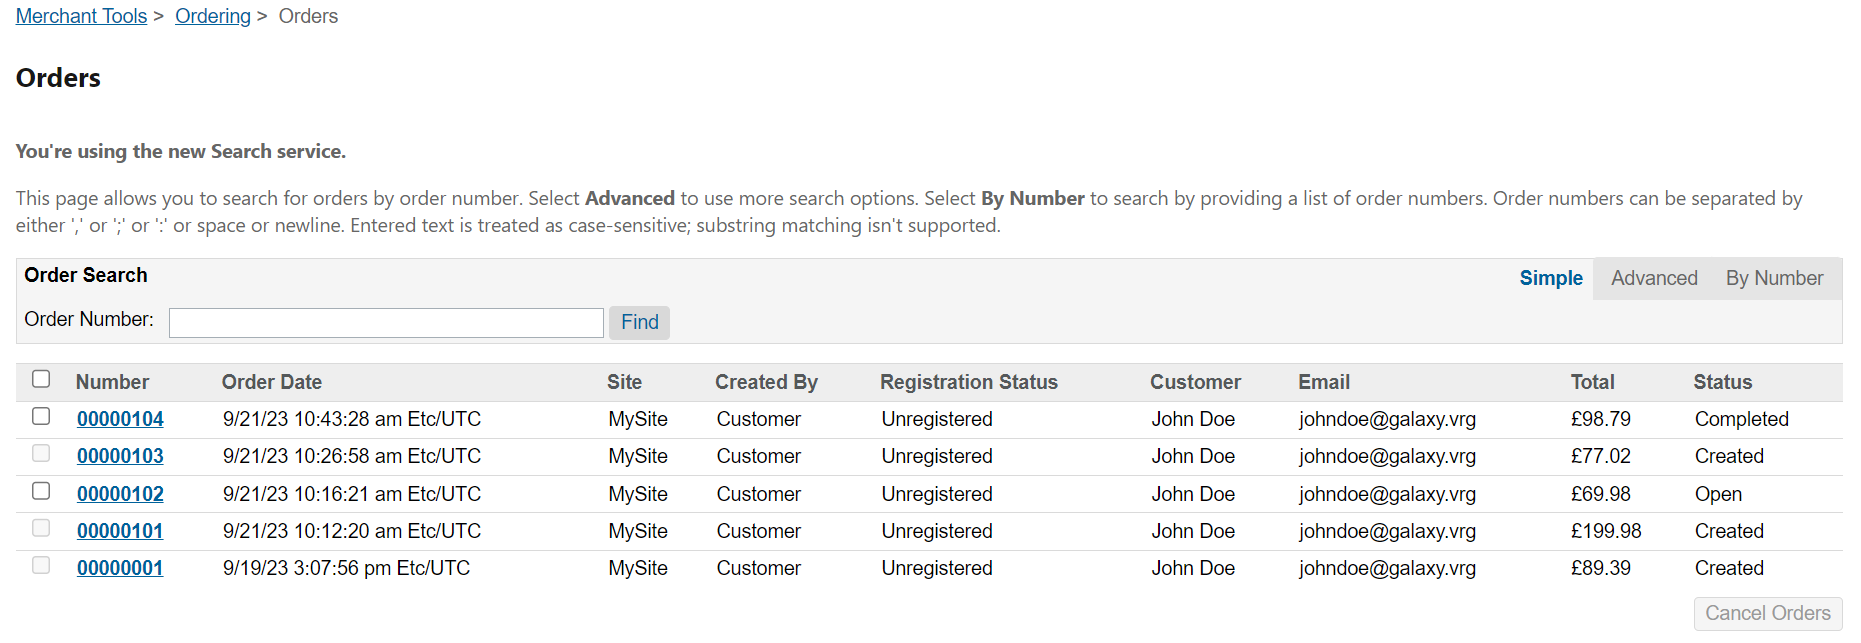
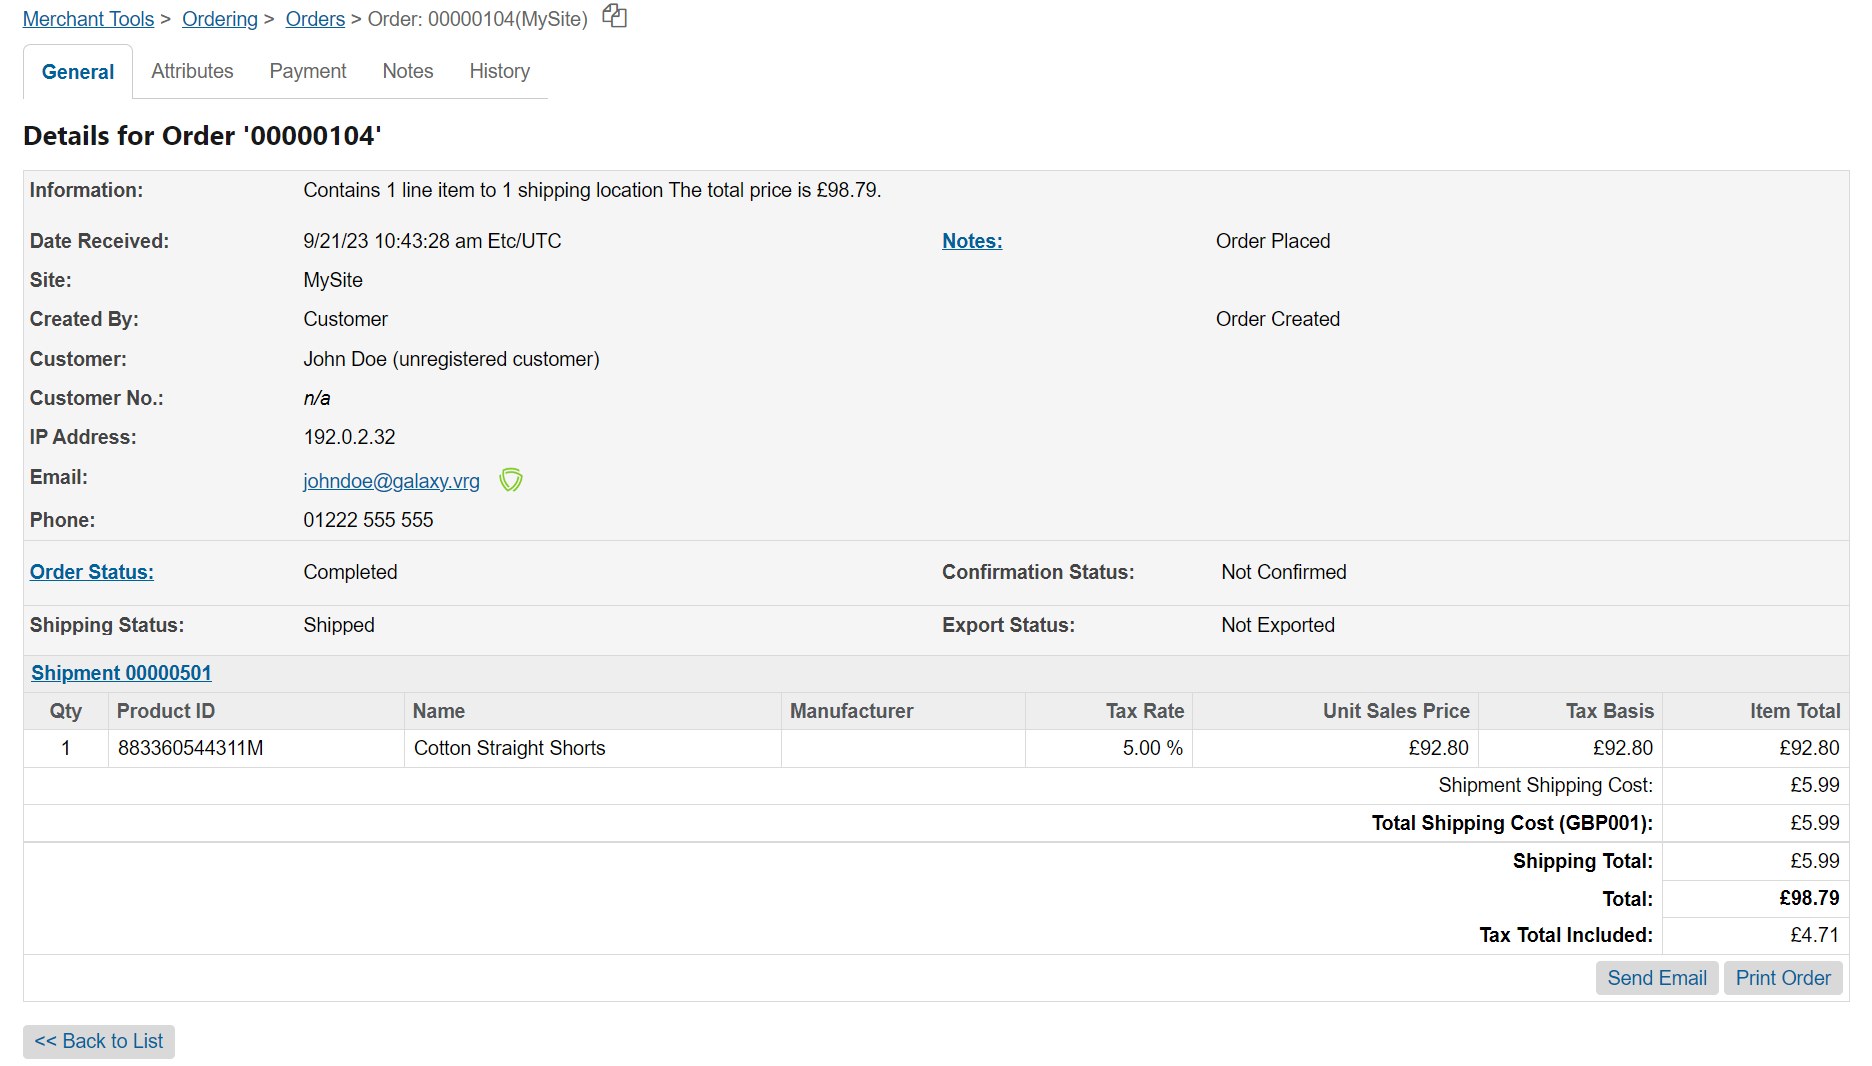
Clicking on an order's entry leads you to the order's tab containing To open the tab of a particular order, click on the order's entry in the register. Each tab contains the details about an order and a payment (such as the order creation date, the purchase amount, method and status, and other information). When working with the ecommpay Salesforce Commerce Cloud Cartridge plug-in, you can use the following tabs:
- General—with the information about the order
- Payment—with the information about the payment and customer's billing address
- Notes—with records about order-related changes including the changes of the payment statues and the capability to add and delete the records
- History—with more detailed information about order-related changes only and without the capability to add and delete the records
The Attributes tab is not needed during the work with the ecommpay Salesforce Commerce Cloud Cartridge plug-in.
More detailed information about working with orders in the Business Manager interface is provided in the Salesforce documentation.
Parameters for using payment methods
When working with the ecommpay Salesforce Commerce Cloud Cartridge, in the Business Manager interface, you can set up the processing of payments with the direct use of cards, with the use of the Apple Pay and Google Pay services and Open Banking methods. You can do this via the payment methods register in the Payment Methods subsection of the Ordering section on the Merchant Tools tab.
The register of payment methods contains rows with methods' identifiers and names, numbers representing the positions of the payment methods in a sequential order on the checkout page (in the columns ID, Name, and Sort Order respectively) and the capability to enable the methods to work via the plug-in or disable them (by setting either Yes or No respectively in the Enabled column) or delete the methods from the register (using the ![]() button in the corresponding column).
button in the corresponding column).
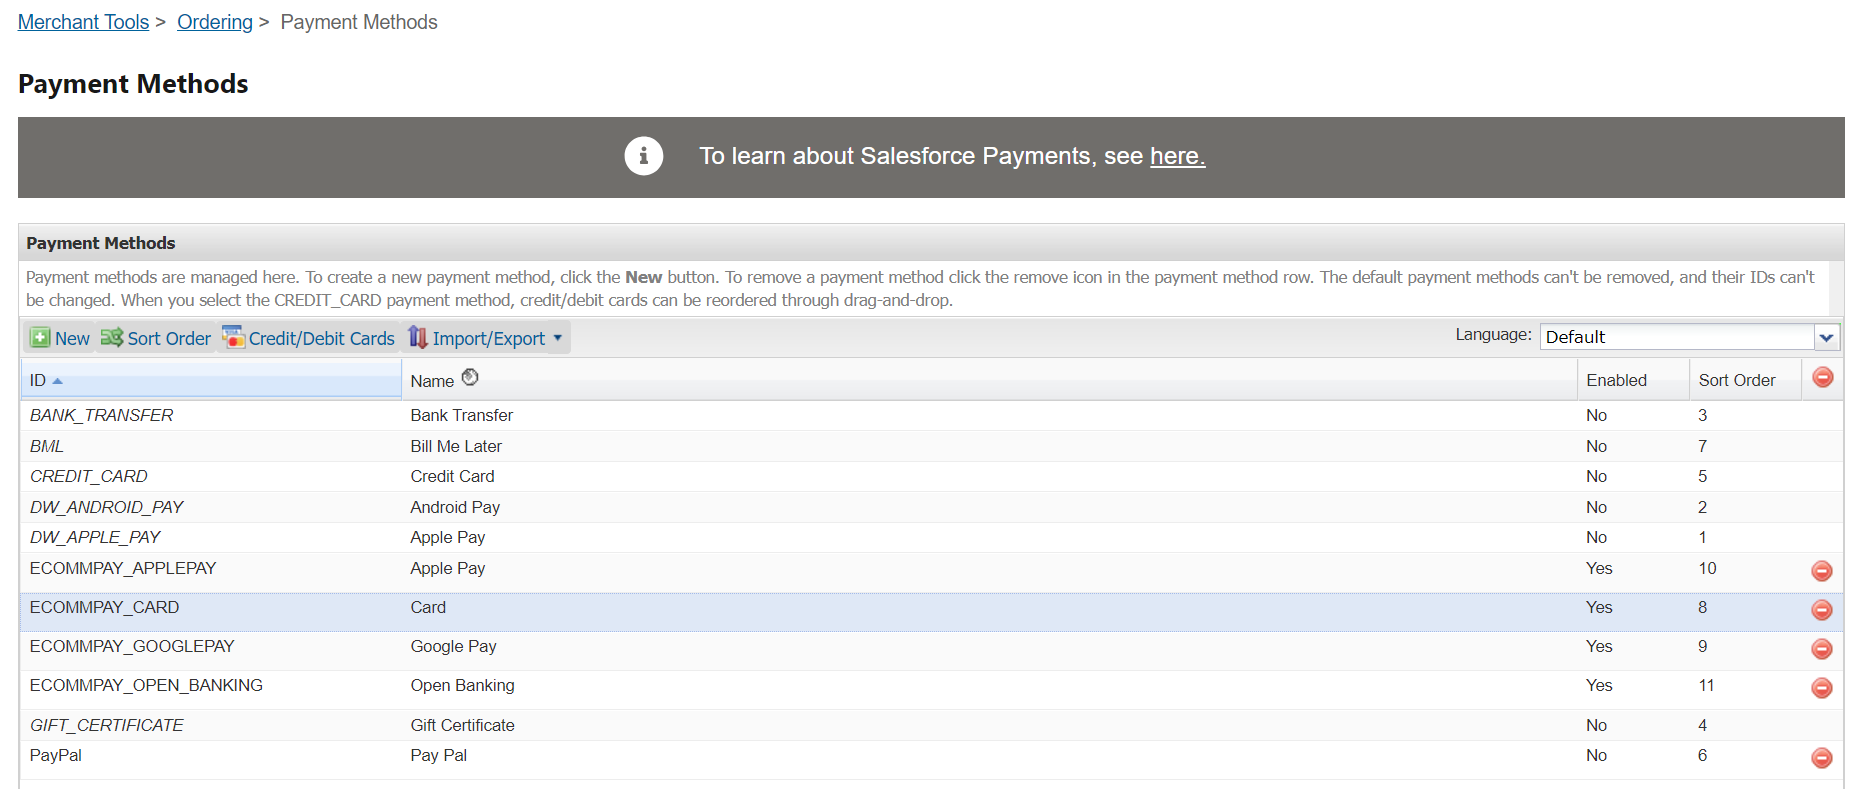
Upon clicking a row of a particular method, you can see the following parameters in the section under the register:
- Description—the text displayed to the customers when they select a certain payment method.
- Image—the payment method logo.
The capability of changing the logos of the methods provided by ecommpay is not supported.
- Payment Processor—the identifier of the organisation through which the processing of payments with the use of the selected method takes place.To process payments via the ecommpay platform, one of the following values must be specified in this parameter:
ecommpay_CREDIT <ecommpay_CREDIT>orecommpay_APM <ecommpay_APM>.ecommpay_CREDIT <ecommpay_CREDIT>—for card paymentsecommpay_APM <ecommpay_APM>—for payments made with the use of alternative payment methods
- Countries—countries in which the selected method is available.
- Currencies—currencies in which payments can be processed with the use of the selected method.
- Customer Groups—groups of customers for whom the selected method is available.
The following values can be set:
- Big Spenders—customers who have spent at least 200 US dollars in the previous month
- Everyone—all customers of the web service
- Registered—customers registered in the web service
- Unregistered—customers unregistered in the web service
- Min/Max Payment Ranges—lower and upper limits of the payment amount with which the selected method is available to make a purchase.
